Almost There: holiday diy
Showing posts with label holiday diy. Show all posts

Tuesday, December 25, 2012

Merry Homemade Christmas

You may have noticed from our 12 Days of Christmas Craze, but just in case, I'll go ahead and tell you that I'm pretty into Christmas.

I get so excited about it every year and I start to go handmade crazy. This year I crafted up my fiance a sweet little book of cards, made my mom a birdhouse out of pottery and baked like crazy!

I'm sure no one out there is still making any Christmas presents, but most of these are universal for any time of year, so I thought I'd just share my version of a homemade Christmas!

You may have seen some version of a 52 Things I Love About You book before on Pinterest. This is the one I was inspired by.

For my book, I just flipped the cards over on their pretty sides and wrote in a Sharpie. Then I cut up paint chips and glued them in between the cards onto paper and put them in a photo album. My fiance (and his whole family) loved it.


For his family, we did a ton of baking because really, who doesn't like a bunch of junk food for Christmas?

We made peanut brittle, rocky road fudge, sugar cookies and chocolate peanut butter cookies. We also geniusly took the caramel popcorn out of one of those popcorn tins (because they always have way more than the butter and cheese popcorn) and drizzled it in melted chocolate.

The recipes for peanut brittle and rocky road fudge can be found here. The chocolate peanut butter cookies are ritz crackers with peanut butter in them dipped in melted chocolate. Brilliant, delicious and so simple!
The sugar cookie recipe is a family favorite, but I forgot to bring it with me so I'll blog about those cookies later. We painted brown bags and packaged up all the goodies in there.

Finally, I took a pottery class last year from my friend Walter Black. He doesn't have a Website yet, but when he gets one I'll probably blog about how cool his work is. Anyway, I made my mom a birdhouse because she likes them, and it's a sweet tradition she and I have where I get her birdhouses at Christmas.


 How has your Christmas been? Did you give away any handmade presents this year?

-Holli Anne

Thursday, December 13, 2012

Sunday, December 9, 2012

Christmas Craze: Candle Holders

To say I'm not really pumped about Day 9 of Christmas Craze is a bold face lie. I've been wanting to make these candle holders for a long time and finally got down to it! They make my inner child do the happy dance and the adult that I try to be smile. So it is my pleasure to show you this very easy DIY for candle holders that can bring a unique look to your home for the holidays and make your young visitors smile!

Enjoy!

What you need:
  • Plastic toy animals that are hollow! I got mine from Target for $3 each in the $1 bin section.
  • Scissors!
  • Free standing candles! I went for the long and skinny ones!
  • Felt!
So the big move happened yesterday and I was just plain optimistic with thinking we would get everything moved in one day. The town house looks like a tornado went through it--the only room with semi order being the kitchen. However, I made sure to bring one of my craft boxes with me so I could do this Christmas Craze. The picture above is a good stretch of Chevron fabric I bought at Hobby Lobby a while back. I plan to make a table runner out of it for Christmas in the next few days. The candle holders I made, I knew I'd want them in the center of the table so I made sure I liked how they all went together.

I loved these two toys from Target and new immediately they would be fun as funky candle holders. I also liked the way they looked on top of the chevron pattern! Also since they aren't really "Christmas" animals they can be used year round!

To make these into candles holders you need to first MAKE SURE they are hollow inside. It's the easiest way to make this DIY work. 

Then you take your scissors and make a wide enough X where you want the candle to go. Now, fun fact: I am a pack rat. I try not to be but over the years I've collected odd things. The two candles I have (pictured up top) were given to me at a college assembly years ago. Since I didn't use them up then I put them in the side of my bag. For YEARS people have asked why I hadn't thrown them away to which I always said "I might need them one day!" Well, that day arrived! I got those candles out of my bag and decided they were perfect!

I made sure the cut was big enough that I could just push the candle inside of the toy. Now, if you really want, you can cut a circular hole and then glue the bottom of the candle there. I didn't want to do that if only for the fact that I want to change out candles eventually.


(Note: Milo sleeping in the background. Once I started working he refused to move!)

With both candles snug I wanted to make them look just a bit more festive but with nothing permanent. That's when I got out my nifty felt! (If you want to know how much I like felt go here.)

Again, I wanted to make sure everything matched to my liking. I had a sheet of glittery green felt that did just the job for me! (Hobby Lobby has a lot of glittery felt!)
Happy with the color, I folded the felt in half and cut out two shapes that I would use as "saddles" for the animals. I then made a hole in the middle just big enough for the candle to fit through!

Then I was done!

Easy, affordable, funky, and unique holiday candles that can be used year round!

Day 1 | Day 2 | Day 3 | Day 4 | Day 5 | Day 6 | Day 7 | Day 8

Saturday, December 1, 2012

Christmas Craze: Felt Ornaments

Oh man, it's December! I'm so pumped and I definitely know that Holli (over at We, Vagabonds) is over the moon about it too! That's why we decided to combine our love for DIY projects and Christmas to do our 12 Days of Christmas Craze (check the ad here)! So many exclamation marks!!!!

Today (Dec. 1) I am starting off the craze by combining three little DIY projects into one. I want it to be noted that the reason this is getting posted so late is because I have a cold and a Milo. These two facts make crafting in a timely manner almost impossible! But, never the less, I hope you enjoy!

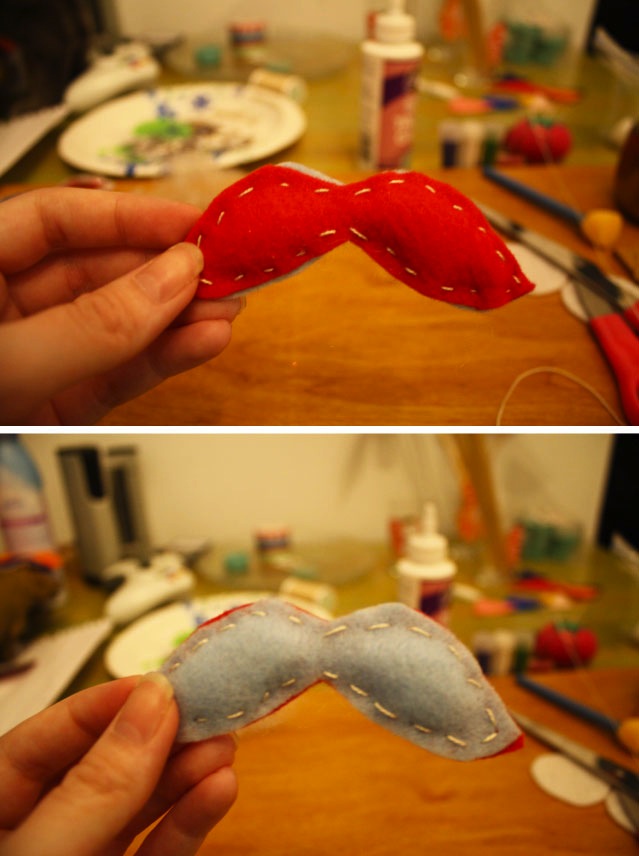
I love felt. It's cheap, pretty, and you can make tons of unique things with it. Since I'm in the middle of a move (we actually move next weekend) I got a tiny tree from Hobby Lobby and wanted to make my own little ornaments for my own little tree. So, as I thought about it, I decided to go with mustaches, glitter, and triangles as my first round of handmade ornaments!


First, I'd like to start with my favorite ornament!

What you need:
  • Felt! For one mustache choose two different colors of felt for a fun look!
  • String! You can really use whatever you want as long as you can thread it through a needle.
  • A needle!
  • Poly-Fil! Or something you can stuff the mustache with!


The steps are pretty easy once you have your mustache pieces cut out. Start sewing around the edges but make sure to leave a gap open to stuff both sides of the mustache before sewing the whole thing closed! Once again, I had some Poly-Fil so I used that to stuff the inside.

Then BAM! The mustache was finished! I like it looking a little sloppy so I got a bigger thread so it can be seen easily and also left some of the felt uneven so I could still see the other color when it hangs on the tree. After this I just got some string and attached to the top so I could put it on the tree!
Next I did some glitter felt combos!

What you need:
  • White felt cut in circles!
  • Glitter! I kept it Christmas-y!
  • Two paint brushes
  • Glue of any kind! I used tacky glue because I had a lot of it!
  • Metallic paint! Though you really don't need this. Glue will do.
Take your sponge paintbrush and dip it in your glue. Apply it to your circles and then put your glitter on a plate or in a bowl (that you can throw away afterwards)! Then take your still wet circles and put them in the glitter until a good amount is covered.

I have a tiny tree so I didn't need to cover all of the circle. I just made sure there was a big enough chunk that looked good and then cut out different circles from them after they dried.

I PROMISE you they look way better in person! Just thread a string through them and put them randomly on the tree! Since my little tree doesn't have lights yet, these add some shine to it!

Lastly, the easiest ornament of the bunch!

Am I weird for loving triangles like I do? Because I really do love them. I actually made this first and decided I liked it a whole bunch!

What you need:
  • Felt! Different colors!
  • Thread! I used the same thread from the mustache one.
  • A needle!
This is easy peasy, folks! Stack them the way you like (I did the biggest on bottom and the smallest on top) and then thread them all together making sure to have the knot on the bottom! Then make a loop so you can hang it on the tree!

So there you go! Three easy, quick DIY felt ornaments that may be simple but still are fun! It gives your tree a little bit of unique flare! I will be making more for my tiny tree that Milo tries to eat at every spare moment and post more pictures later! 

Check back every day for more Christmas Craze! More exciting DIY projects are on the way!


Tuesday, November 20, 2012

DIY Fun: Festive Acorns


Okay, so maybe the phrase "festive acorns" doesn't immediately grab your attention. I'm sure you weren't at work today or just lounging and then BAM you wanted some festive acorns in your life. But maybe you DO need them!

In honor of Thanksgiving I've made the trek home to have some family time, which means that my craft supplies have also taken a vacation from me. They are tucked away at home, probably hiding from Milo (that cat loves him some crafts to gnaw on)! However, when I first got here I noticed that we have no Thanksgiving-y decorations around the house. Well, I had to change that.

So here is a DIY project that is easy, affordable and produces cute/fun results! I want to go ahead and apologize for the glare and odd lighting on some of the pictures...It's vacation, right?

Festive Acorns
Two small, glittery faux acorns
One large, chalkboard faux acorn

Materials Needed--All can be found at Hobby Lobby
Papier-mâché eggs (I only got three since we are so close to Thanksgiving and I don't have more time to decorate)
Chunky Yarn (I suggest a bit bigger than what I actually used...less spiraling) 
Tacky Glue
Three Paint Brushes (Or you could be bad like me and use the same one, just wash it thoroughly after each use...remember, I don't have my craft box with me so I'm limited with what I have)
Glitter (I used gold and silver)
Hot Glue Gun + Glue Stick
Chalk
Then you could get...
Any paint color of your choice (I went with black)
Clear Chalkboard Coating
OR
Chalkboard Spray Paint

(Did I also mention that the only stretch of fabric I had was this very loud and distracting chevron? But I had to improvise with my makeshift workstation!)

Now let's start!

If you went my route and got Clear Chalkboard Coating then I suggest you start on the big acorn first.

I'm a big fan of the coating versus the spray. The only reason being is that you can paint the area you want to chalk with any color and then use the coating on top of it to make it chalk-safe. I decided to go with black paint to make it feel more chalk board-y...plus I realized I didn't have another color when I got home! 

First take your big egg and mark off the top area that you don't want paint to get on. I suggest a tape that isn't intense so it won't take off the paper of the egg when you remove it. I used some really funky duct tape that isn't that sticky. I'd suggest washi or painter tape.

Now paint the bottom of the future acorn and let it sit and dry while you move to the glitter ones.

Get your Tacky Glue and a paintbrush and spread the glue around evenly on the bottom of your future acorn. Then take your glitter and sprinkle it on while spinning it in your hand. My step mom isn't a big fan of lots of glitter so I tried to ton it way back so you can still see the original paper of the egg.

Do this to both eggs and let them dry while you return to your chalk egg. 

Now it's time to paint the Chalk Coating on your dry egg. Paint this coating vertically. Then let it sit for an hour.

Then comes the yarn-spinning part where you make the top of the acorns. Find a starting point at the very bottom of the acorn's top that will cover up the parts of the egg not glittered. Use the hot glue gun to dab some glue on that spot and then put the beginning of the yarn on it. Let it dry and then wrap the egg in spirals until you make it to the very top. You can make a stem with the yarn but I liked making a little loop, using the hot glue gun to seal it. This part was my least favorite if only because my patience level varies depending on my caffeine intake...and I hadn't had my coffee.

After you make the tops to both glitter acorns (or an hour has passed), paint another coat of the chalkboard coating horizontally. Then the directions say to let it cure for 24 hours before actually writing on it with chalk, but I COULDN'T TAKE IT! I wrote on it after only four hours and it seems fine? 

It's fine.

Do the same technique as before to complete the top of your chalkboard acorn and you should be done!

I finished mine but it was so dark that my pictures looked odd and we didn't have time to look for the nice bowl to put them in as a centerpiece, but I PROMISE they look completely adorable in person. Not to mention that you can totally draw all over one with chalk!

I hope you liked this DIY and happy early Thanksgiving!

LinkWithin

Related Posts Plugin for WordPress, Blogger...
Pin It button on image hover