Almost There: diy projects
Showing posts with label diy projects. Show all posts

Monday, December 3, 2012

Christmas Craze: Handmade Wreathes


12 of Christmas Craze is brought to you by Almost There and We, Vagabonds! Check out Day 1 and Day 2!

I have never had my own wreath. SO THIS IS WHAT I DID TODAY!

Instead of one large wreath I wanted two smaller ones because right now there's not a lot of space in the apartment and I'm moving next week so I thought it would be easier!

First I decided to make a clothespin wreath. I had seen a lot of them on Pinterest and wanted to make one with my own flare.

What you need:

  • Clothespins! I used about 23! You can get them at Walmart or any craft store for really cheap!
  • Paint! I used black paint and metallic paint.
  • Wreath frame! Craft store!
  • Clear Chalkboard Coating
  • Paintbrushes! 

First I went ahead and clipped the pins on the frame and decided what pattern I liked. Then I painted every other pin black. I used my clear chalkboard coating after the paint dried so I can use chalk on each one. Then I let it sit.

Next I decided to go with metallic gold paint for the rest of my pins.

While I let them dry I wanted to give the wire frame a touch of green. So I got my green hemp and did this little goofy move!

I let everything dry for about an hour! Then I got my chalk out and made little doodles on each black pin! 

This wreath is funky but I have to say I'm very pleased! What I like the most is that everything that was used to make it can be reused after the season!

Next I wanted to make a super simple but pleasing to look at wreath with string!

What you need:
  • A Styrofoam Wreath! Get some tape to close the gap at the top!
  • String/Hemp! It's up to you!
  • Scissors
  • Hot Glue Gun & Glue

This wreath is super simple to make. It took me about thirty minutes to wrap the whole thing. 

I found it was easier to wrap it in sections rather than try to do the whole thing in one go. I used dabs of hot glue to keep the string on each end.


To add some color to my simple wreath I got my green hemp and did another little goofy loop around it.

So there it is! Two handmade wreathes that are easy to make and are fun to add to your holiday decorations!

Hope you enjoyed!


Saturday, December 1, 2012

Christmas Craze: Felt Ornaments

Oh man, it's December! I'm so pumped and I definitely know that Holli (over at We, Vagabonds) is over the moon about it too! That's why we decided to combine our love for DIY projects and Christmas to do our 12 Days of Christmas Craze (check the ad here)! So many exclamation marks!!!!

Today (Dec. 1) I am starting off the craze by combining three little DIY projects into one. I want it to be noted that the reason this is getting posted so late is because I have a cold and a Milo. These two facts make crafting in a timely manner almost impossible! But, never the less, I hope you enjoy!

I love felt. It's cheap, pretty, and you can make tons of unique things with it. Since I'm in the middle of a move (we actually move next weekend) I got a tiny tree from Hobby Lobby and wanted to make my own little ornaments for my own little tree. So, as I thought about it, I decided to go with mustaches, glitter, and triangles as my first round of handmade ornaments!


First, I'd like to start with my favorite ornament!

What you need:
  • Felt! For one mustache choose two different colors of felt for a fun look!
  • String! You can really use whatever you want as long as you can thread it through a needle.
  • A needle!
  • Poly-Fil! Or something you can stuff the mustache with!


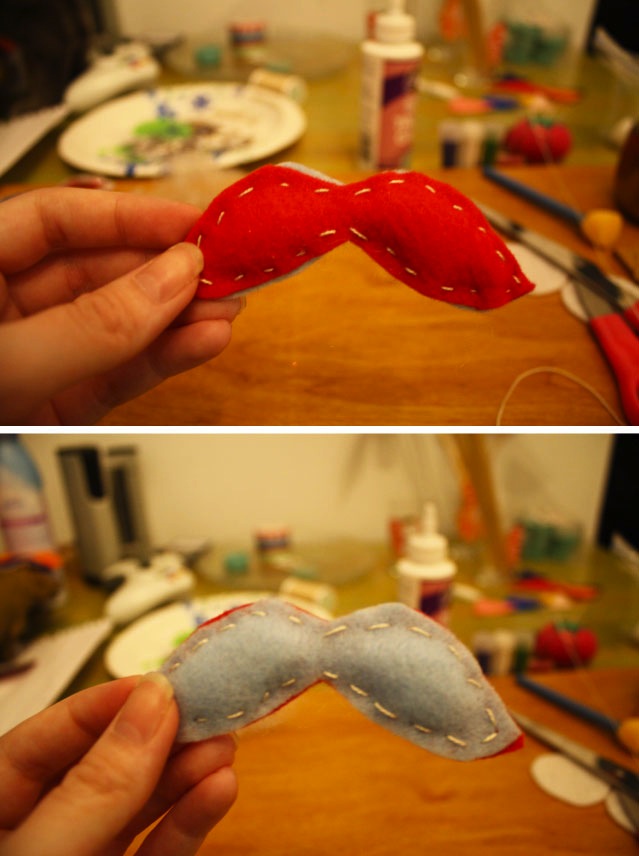
The steps are pretty easy once you have your mustache pieces cut out. Start sewing around the edges but make sure to leave a gap open to stuff both sides of the mustache before sewing the whole thing closed! Once again, I had some Poly-Fil so I used that to stuff the inside.

Then BAM! The mustache was finished! I like it looking a little sloppy so I got a bigger thread so it can be seen easily and also left some of the felt uneven so I could still see the other color when it hangs on the tree. After this I just got some string and attached to the top so I could put it on the tree!
Next I did some glitter felt combos!

What you need:
  • White felt cut in circles!
  • Glitter! I kept it Christmas-y!
  • Two paint brushes
  • Glue of any kind! I used tacky glue because I had a lot of it!
  • Metallic paint! Though you really don't need this. Glue will do.
Take your sponge paintbrush and dip it in your glue. Apply it to your circles and then put your glitter on a plate or in a bowl (that you can throw away afterwards)! Then take your still wet circles and put them in the glitter until a good amount is covered.

I have a tiny tree so I didn't need to cover all of the circle. I just made sure there was a big enough chunk that looked good and then cut out different circles from them after they dried.

I PROMISE you they look way better in person! Just thread a string through them and put them randomly on the tree! Since my little tree doesn't have lights yet, these add some shine to it!

Lastly, the easiest ornament of the bunch!

Am I weird for loving triangles like I do? Because I really do love them. I actually made this first and decided I liked it a whole bunch!

What you need:
  • Felt! Different colors!
  • Thread! I used the same thread from the mustache one.
  • A needle!
This is easy peasy, folks! Stack them the way you like (I did the biggest on bottom and the smallest on top) and then thread them all together making sure to have the knot on the bottom! Then make a loop so you can hang it on the tree!

So there you go! Three easy, quick DIY felt ornaments that may be simple but still are fun! It gives your tree a little bit of unique flare! I will be making more for my tiny tree that Milo tries to eat at every spare moment and post more pictures later! 

Check back every day for more Christmas Craze! More exciting DIY projects are on the way!


Friday, November 16, 2012

Project Teaser

I am working on a post that involves living room fun, mini DIY projects, and recycling common household items! Basically, inexpensive ways to be happier with your living space.

So here's a sneak peek until tomorrow! Get excited!

Thursday, October 4, 2012

Crush Thursday #4

Normally I like to show what fashion items or home décor I'm crushing on. However, the past two weeks I've been researching DIY projects that I'm going to start doing and have been overwhelmed the sheer amount of awesome ones out there.

So Crush Thursday #4 are four DIY projects I have found that are amazingly creative.
(All names are linked to the site & post where the pictures were taken from. I do not own any of the following.)

Enjoy!


1.) Gold Leaf Paper Mache Bowls: I've seen these floating around Pinterest and each time have had to stop and just stare. They are just plain cool and I definitely will be making them in the future! 


2.) Water Bottle Chandelier: I'll be honest. I'm like the little girl from Signs when it comes to water bottles. They always seem to be around in excess. Normally I try to recycle but I'm thinking about saving a few of the many and making this!


3.) Teepee: This just looks fun. Must try!


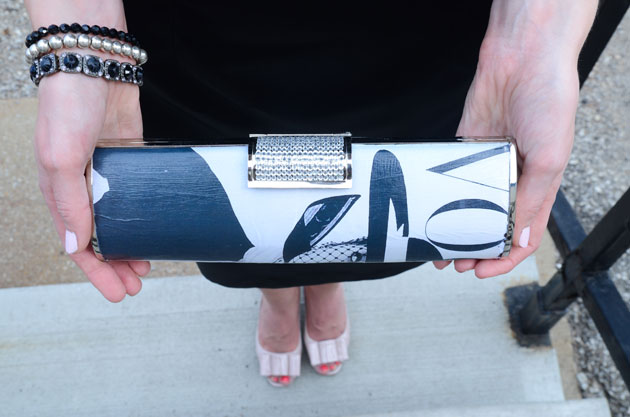
4.) Rolled-Magazine Clutch: I want to make this...but with a different magazine other than Vogue...perhaps HGTV? (It's fine.)

Hope you enjoyed! 

Are there any DIY projects that have caught your eye?
__________________________________________________________________________________
chasingthere@gmail.com


Thursday, September 27, 2012

Late Night DIY: Mini Piñata

I never thought I'd tell myself that I need to practice making piñatas but low and behold that's what I said just minutes ago. 

See, I'm planning a party in the next few months and was trying out different ideas I had found on the web. You know, cool DIY projects and the like. When I saw a mini piñata I just had to try it. So I got a cereal box out, found some tissue paper and grabbed some tape and glue and got to work.

It did not go as I had expected. This DIY project should be done during the day when sleepiness isn't a factor and playing loud music isn't frowned upon. Either way, I spent a good hour on Bobby the Piñata (and I only did the one side!)  so I'm going to share my dramatic-looking pictures of the less-than-perfect job this sleepy blogger performed. (I will do this again very soon!)


Doesn't Bobby look so intense?

Monday, September 24, 2012

Late Night DIY: Clementine Candle


Let me start off by saying how proud I am of the above picture. While pinning I found an old Apartment Therapy DIY project. It's called How To: Make a Clementine Candle and it looked too cool to pass up. 

So I went to Walmart, got my supplies and sat my happy butt down and made my own clementine candle! You should try it too! It's easy and fun!

Keep reading to see how it's done!

Saturday, September 1, 2012

Plan of Attack: Living Room Shame

Why I thought  I was going to be able to do a little drilling and hammering and making CCD No. 1 (what is a CCD?) dissapear is beyond me. When I told Dude what I was going to do he promptly told me that today was Football. I would not be drilling or hammering. I would not be a distraction. I would not touch the TV. Living in the South, that start of football is sacred.

So instead I brainstormed, drew a very rough sketch and Pinterested my little heart out.

I decided to tackle the living room first if only because we entertain a lot. My office is more or less off limits unless someone stays over and uses my futon. So I stood and looked at the living room's CCD and decided I wanted to tackle our two plastic bins of movies and video games first.

Once the DVDs are taken out of the long bin on the right and the short one under Milo's bag of yarn, we would have two empty containers for the storage room!


Now, the above picture is what I am going to ATTEMPT to do with all of these DVDs. If you looked up DVD storage in Pinterest (because that's where I always go first) you will find awesome ideas and products...that are way out of my price range. After driving that route for a while, I hit a dead end then searched book storage instead.

That's when I found this:


Easy, inexpensive and effective. Not to mention, once the DVD boxes are all stacked amongst the four different areas I drew above, it will bring an interesting look to the living room. From the couch we will be able to search through all of the movies without moving. Once we pick one, we won't have to move odds and ends out of the way or bend over until we find the one we are looking to watch. (We're not lazy I promise!)

However, I'm concerned about the space above the right side of the TV. It's not as wide (it leads into the hallway) so visually it would be awkward. That space needs to have some kind of (preferably)  functional decoration. I would also like to hang a piece of art above the TV. I'm thinking mirror to open up the small room. 

This project is my goal for tomorrow. It won't completely destroy the living room's CCD but it will weaken it considerably. 

We'll just have to see how it goes!
__________________________________________________________________________________
chasingthere@gmail.com

Thursday, August 30, 2012

Confounding Corners of Doom

I am the QUEEN of clutter. You think your tiny space has a lot going on? Probably can't compare to mine. Over the years I've squashed most of my pack rat urges but there are just some things I can't quite let go of. So I put random trinkets in plastic tubs, boxes or just let them roam freely throughout the apartment. A part of me is deeply ashamed at my lack of will power but some tendencies are too hard to let go of sometimes! (It also doesn't help that I live with Dude who doesn't believe in organization or, for the matter, laundry baskets.)

I probably could have continued to live my life as the Ruler of Unnecessary Clutter but since I work from home, I get a 24/7 view of messy clutter and I just can't take it anymore!

So, with one of the MANY To Do lists I've acquired, I've decided to tackle the confounding corners of doom that reside in my apartment. For all of you out there who live in tiny spaces but have a lot of things (whether unnecessary or not) you may have one or two of these.

What are CCDs?

Wednesday, August 29, 2012

Mantel Love: Your Living Room's Thesis Statement

Do you have a mantel that makes you ashamed? Does it have so much potential that you know you've missed? Are there random knick knacks that you just threw up there because--let's be honest--there isn't anywhere else to put the bronze skull statue your significant other bought at a garage sale or that Beanie Baby that lost its tag when you were 12?

To me, the mantel is like your living room's thesis statement--this is who I am, this is what I love.

There are so many statements you can make that it's easy to get gun shy. You dig the fam jam, are totally utilitarian, have a wicked color addiction or dance to the own beat of your drum. Which will it be? And once you have a theme, will you be able to pull it off?

Well I may not have a fireplace/mantle but I have a lot of ideas of what I want to do with one when I have it. Here's a compilation of ideas and pictures taken (and linked back to) other blogs and Pinteresters plus a few ideas of my own!

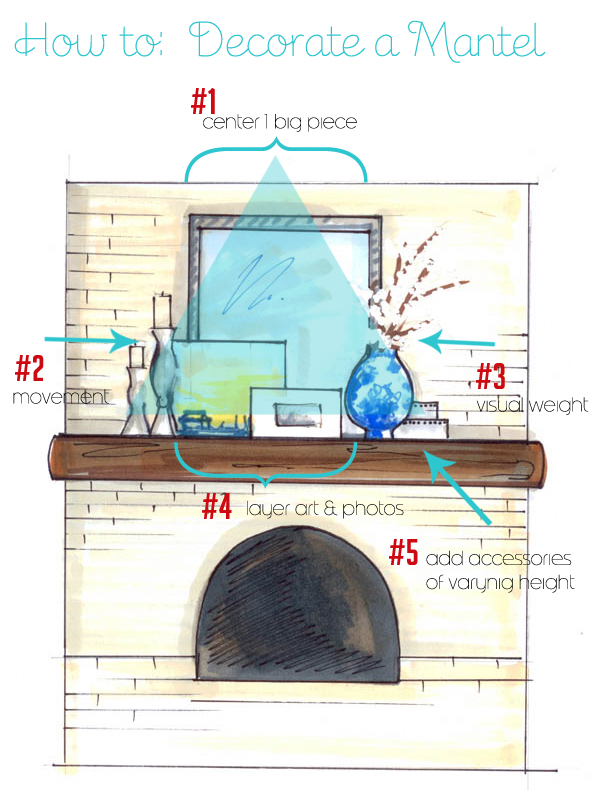
Honey & Fitz (a blog definitely worth a follow) posted an article that inspired my love of the mantel I don't-yet-have. In this post they had a picture that showed the flow of a nicely decorated mantel for those needing a creative boost.
Normally I try to come up with my own decorating rules (because my momma raised me stubborn) but what Honey & Fitz did (and Steven and Chris before them) really pleases me. Visually it's pleasant and has a lot of potential.

So here are five easy ways to make a visual triangle out of your lovely mantel décor plus some great Pinterest finds to make my imaginary mantel aesthetically-pleasing.

1.) Center a large piece on your mantel.
You can go either art or mirror. I love the look that a unique mirror can bring to a room but for a mantel I would have to go with art. So, in my quest to decorate MY future mantel, I picked Artist Yuka Nareta's Focus. This watercolor appreciates my love for whites space, color and inspirational quotes.

2.) Add something with movement to the left. You want your eye to visually flow from one direction to the other.
This is where I go in search of fun knick knacks that are a part of a collection and of varying sizes. How about those trendy owls? You just can't go wrong with owls--no matter their color, size or medium. Place the shortest one on the outside and line them up to the tallest.

3.) Add something with visual weight on the right. This will counterbalance the movement element on the left.
This is where that great vase you have tucked away in a cabinet or lonely on top of the refrigerator comes into play. Bold, beautiful color or wacky design would definitely make a statement. I personally want a vase that, even if there aren't beautiful flowers in it, can still make a statement. So I mustache you, why not a vase with facial hair?
4.) Layer in a couple of additional frames pieces in a cluster.
This is when I would bring out the funky colored frames of different sizes and designs and fill them with silly pictures of loved ones.

5.) Balance that on the opposite side with a couple of accessories in a cluster of varying heights.
Books, books, books! If you're a book lover then you have plenty of them around. Do you have a few special editions that are just adorable? Use them! Take a few books and stack them up to the right of your mantel. Get a few more little knick knacks that don't necessarily come from the same collection and place them on top of those lovely books!

These are the five steps to make a great-looking mantel. To tell your guests that YOU ARE AWESOME and so is your house! If you're like me and don't have a fire place or a mantel yet, don't fret! You can still design one and dream!

Remember, we may not have our dream house yet, but we're almost there!
__________________________________________________________________________________
All images not credited can be found on the Pinterest board "Fire Over Here!"
Follow my blog with Bloglovin

LinkWithin

Related Posts Plugin for WordPress, Blogger...
Pin It button on image hover