Almost There: advice
Showing posts with label advice. Show all posts

Tuesday, July 2, 2013

Writer Talk: Erin's Grammar Guide

Due to the Annes trying to finish their books, they have asked some of their favorite bloggers/writers to guest post! Enjoy!

Thank you, Tyler and Holli, for hosting me on your blog today! I am thrilled to have the chance to “talk” to your readers/blog followers!

Today, I’d like to talk about a subject near and dear to my heart—grammar. LOL! Yes, you heard me right…grammar. My family and friends often say I’m a member of the Grammar Police (actually they say something not quite so nice, but I’m rephrasing). Lest you think I’m the master of all things word related, I will confess right now…I cannot spell, at all. Seriously, I could not spell certain words without assistance if my life depended on it. My critique partners also point out my issues with formal speech (probably because I’m trying to follow all the grammar rules) and hyphenation (which for the record, I just misspelled).

You might ask, who even loves grammar, and when did you develop this affliction? Well, I went to one school up until the tenth grade and learned very little about grammar there. When I switched to a new school in the eleventh grade, my world changed. The teacher started my first day of class by saying, “Today, we will discuss predicate nominative and predicate adjective,” to which I replied, “A wha-wha?” I knew a noun, verb, and possibly an adverb, but nothing more. To her credit, my sweet teacher, Mrs. Hinton (she’s a writer too and has published books you can find here), stayed after school with me for six months to catch me up on grammar.

I ended up at a college that obsesses over grammar. Freshmen must take a course called “Grammar and Composition” and pass an end-of-the-semester test with a “C” or higher to continue on to the next class.  In preparation for that test, I took a free class offered by the head of the English department and learned all sorts of amazing tips and tricks. I passed the test with flying colors and received a position in the school’s learning center as a grammar and writing tutor. So, I spent the remainder of my college years trying to impart the grammar wisdom my high school teacher and college professors instilled.

Now that I am a soon-to-be-published author, I have the privilege of working with fellow authors. We critique one another’s “works in progress” to sharpen and improve them for submission. My critique partners recently dubbed me “The Passive Voice Hunter,” a name I quite like.

Without further ado, let me introduce common grammar/writing errors. I hope the following information will be useful whether you are a writer, business professional, student, or any other type of human being (LOL!).

1) Passive voice
The use of active voice improves writing and flow. Try to avoid passive verbs like: was, were, had been, is, has been, had been, will be.

A passive example: “I was editing my friend’s work.” 
An active example: “I edited my friend’s work.” 

2) Ending in a preposition 
Try not to end sentences with prepositions.

Example of preposition: “She didn’t know where he came from.” 
Correction: “She didn’t know from where he came.”** 

**This correction sounds slightly pompous and awkward, so the writer would benefit from reworking the whole sentence.
Reworking option (there are many other ways to change it): “He appeared by her side without warning.” 

Common prepositions: of, in, to, for, with, on, at, from, by, about, into, as, after, over, against, before

3) Commas (cue the “dun-da-dun” music)
I typically joke, “People treat commas like sprinkles.”

Here are the main rules for commas (there are more, but we’ll stick to the big ones):
a) Serial commas (this particular rule changes every once in a while, so keep an eye out on MLA). Right now, commas go before the “and” in a series. 
Example: Apples, banana, strawberries, and blueberries. 
b) Conjunction and commas. Commas can be used to separate two sentences when used with a conjunction. Common conjunctions: and, but, or, so, yet 
Example: Jenna believed her father when he told her John left, but she felt compelled to discover the reason. 
Incorrect usage of a comma: Jenna believed her father when he told her John left, but felt compelled to discover the reason. (No comma is needed in this sentence because there are not two sentences.) This sentence should read: Jenna believed her father when he told her John left but felt compelled to discover the reason. 
c) Introductory statements. When you begin a sentence with a helper statement, you should use a comma to separate the two piece of information. Introductory statements with more than three words require a comma. With statements fewer than three words, the comma is optional, but I always choose to include it. 
Example: When you begin a sentence with a helper statement, you should use a comma to separate the two pieces of information. (Clever how I did that, huh? I bet you can find a few more in my explanation as well…) 
d) Parenthetic elements. Use commas to offset information you wish to include but is not crucial to the sentence. When you place two commas (or one comma in the front and period at the end), you are signaling the reader that this information is NOT necessary. If it is necessary, do not offset in commas. 
Example 1: My best friend, Dawn, told me a hysterical joke yesterday. 
*Note—I only have one best friend, hence the name “Dawn” is unnecessary. However, be careful in these situations. “My friend Dawn told me a hysterical joke yesterday” has no comma because (hopefully) I have more than one friend. 
**To explore the note a bit further, here is another example: “My brother, Richard, graduated top in his class.” Based on this statement, you should know I only have one brother. If I said, “My brother Richard graduated top in his class,” you would know I have more than one brother. 
Example 2: Charlotte loved going to baseball games, though she preferred football.  
The football segment could be totally omitted and not compromise the integrity of the sentence. 
Example 3: He moved toward the door, placing his hand on the knob, and turned to give her one last look. 
The hand on the knob adds to the sentence but is not crucial. The sentence could be just fine without it. “He moved toward the door and turned to give her one last look.” 
e) Separating adjectives. Use commas to separate adjectives that both relate to the noun. If one adjective is describing the other, leave out the comma. 
Example: She pushed the big, yellow ball down the hill. 
Big and yellow both describe ball, so the comma needs to be there. 
Incorrect use: She pushed the bright, yellow ball down the hill. 
Bright describes yellow, not the ball, so no comma is needed. Should read: She pushed the bright yellow ball down the hill. 

Though there are plenty more grammar rules I could share, I think I’ll stop before your eyes glaze over (if they haven’t already—LOL). Often, it’s hard to see the errors in your own work. Asking friends, family, or co-workers to proofread your material before you send it out can be most helpful. My beta readers (Kim Sharp, Ginny Hunsberger, Danielle Craver, and Dawn Ward) as well as my critique partners (Mary Waibel, Michelle Pickett, and Meradeth Houston) locate the grammatical, spelling, logic, and voice errors in my pieces. I encourage you to find a group of people to help you as well.

If you have grammar questions, please feel free to ask. I love to talk “shop.” Thanks again for hosting me, Tyler and Holli!

Also, if you want to know more about me and my upcoming novel, The Prophecy, please like me on Facebook (Erin Albert Books), follow me on Twitter (@ErinAlbertBooks), and/or visit my website www.erinalbertbooks.com.

Until next time,
Erin

Erin Albert is an author and fitness trainer. Since she picked up Morris the Moose Goes to School at age four, she has been infatuated with the written word. She went on to work as a grammar and writing tutor in college and is still teased by her family and friends for being a member of the "Grammar Police." In her free time, Erin enjoys acting, running, kickboxing, and, of course, reading and writing.

Remember to check Erin out at:

Facebook - Twitter - Website

Thursday, May 23, 2013

Inspiration: Making Your Book Real


Writing a book, no matter the content, can feel unreal at times. Sure you can sit down at your laptop and write and write until your fingers cramp and you get a small headache behind your eyes, but that doesn't mean it feels real yet. You're just another person with another story. Anyone can sit down and write nonsense.

However, not everyone will get published.

This thought can be a daunting, self-damning one that keeps you from pushing yourself that much harder to complete your book. I know because I've been writing a book series for more than seven years and, if you Google my name, you won't see the credits to a best-selling book series attached to it.

It's not that I don't have faith in my characters, the plots, or the writing...I just had a hard time getting my figurative feet moving forward.

Until recently when I found inspiration in myself.

A week or so ago I self-published a writing prompt book (go here) and, while the intricacies of publishing alone made me feel like I was being productive, it was the final preview that made it real. It showed me how the book would look on a Kindle and I got to turn the pages to my own story made public.

The Dark Side of Writing: 35 Writing Prompts is not my main writing project, however, it made me want to see how my novel-in-progress would look on an eReader. I converted the files and sent it to my Nook. There I was able to read everything I had written via my lovely Nookina.

It inspired me all the way from my hair to my toes! Seeing it how others would (hopefully) view it made everything very real. It gave me that push I needed and I have written more in the past week than I have in the past two months combined! It is my heartfelt advice for you to do the same.

The following instructions are how I converted my Word .doc (or .docx) to an ePub file:

Note: I didn't get intense with formatting since I just really wanted to read the content. I'll have another post on here soon about how to format a word document the best way for an eReader. All I did was bold my new chapter headings. 

1. Open up your .doc or .docx and Save As .htm. If you don't have a title for your book, then go ahead and give it a temporary one.

2. I went to Calibre.com and downloaded a free version of their program here. It's an eBook management program that can convert an .htm file to an ePub one. (ePub files can be viewed on eReaders.)

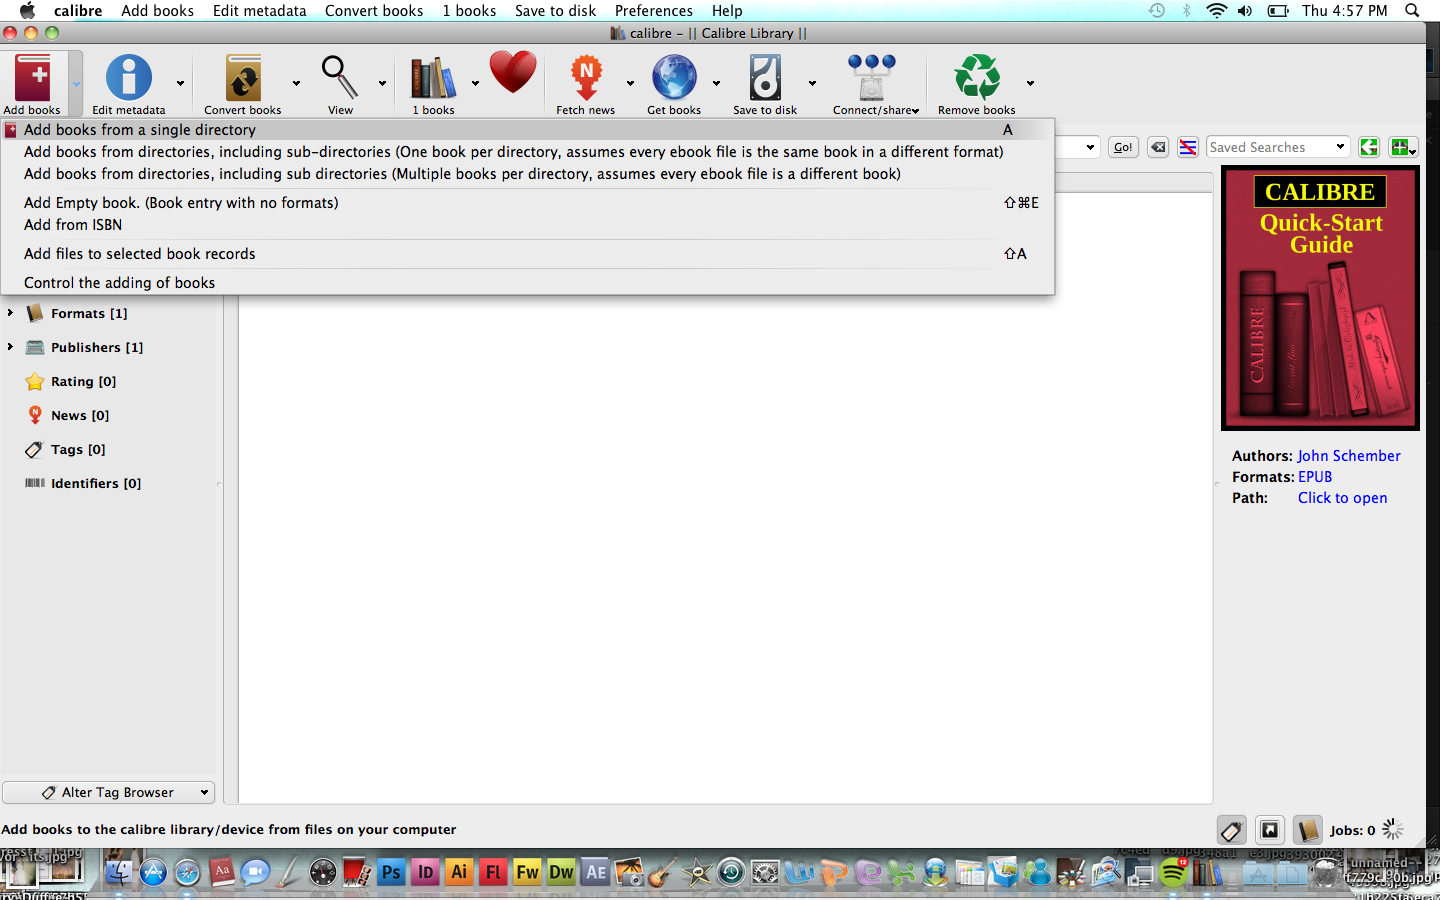
3. Open up Calibre and go to Add books on the top left then Add books from a single directory. Once you click this you will be able to chose the .htm file you saved.


4. Your file will show up in the Calibre main screen. It should be above Calibre's Quick Start Guide. Select your file until it's highlighted blue and go up to Convert books, then Convert individually.

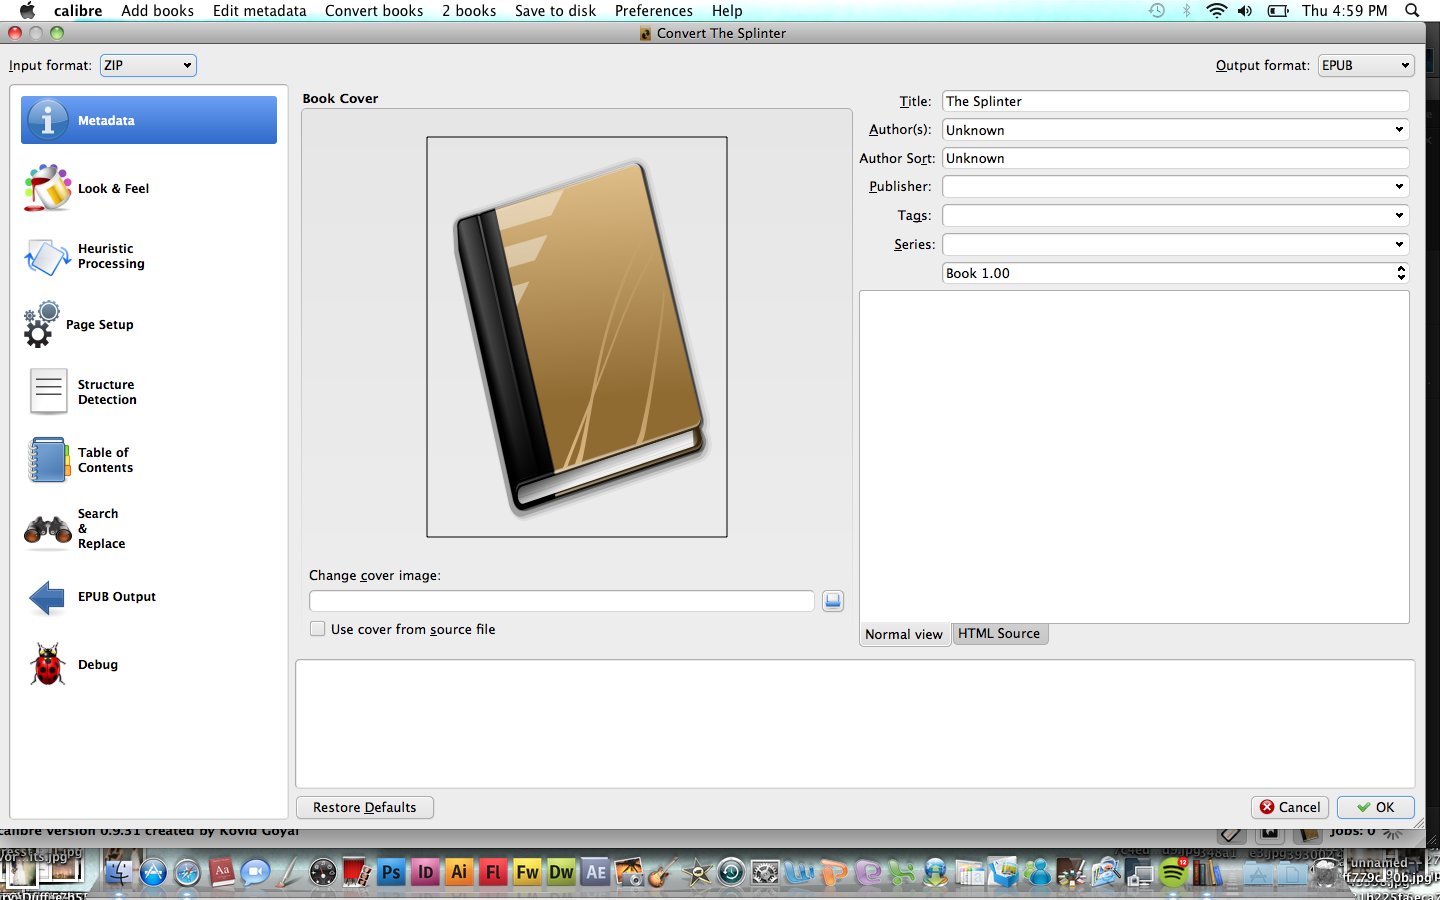
5. A new screen will pop up and, if you really want, you can fill out all of the details. Seeing as mine was a crazy rough draft I left everything as it was and just hit OK. This starts the conversion process. It shouldn't take more than a minute depending on its size.

Now you have an ePub file that can be read on your eReader. All you have to do is search your computer for the file name!

Don't know how to send the ePub file to your eReader?

For Kindle
Connect your Kindle device to your computer. Once it is recognized you will see a new icon at the top of Calibre called Send to Device. Click to highlight the ePub books you want to send to your Kindle and click Send to Device. You will be asked to auto convert. Do it!

Once the job is done, disconnect your Kindle.

For Nook
I like the whole drag and drop process. Connect your Nook and take your new ePub file and drag that sucker to your Nook's Documents. Drop it in and then disconnect!

It may seem complicated but it's super easy and highly effective! Seeing your book on an eReader may give you that pesky push and dose of inspiration you need to finish your book!

Enjoy!
-Tyler Anne (aka Chick Tyler)

Wednesday, May 8, 2013

Writer Talk: Tyler talks music


I've heard the myth about the writer that prefers silence when they write. How they choose to turn everything off and write to nothing but the sound of their fingers hitting keys. They write fight scenes, love scenes, murderous scenes, happy scenes to the sound of nothing.

I'll never understand those people.

Sure, I've written before without a sick beat to help me along but I try not to make a habit out of it. One of the biggest pulls of inspiration I get when writing comes from music. I have had writer's block completely cleared before by just listening to Pandora and stumbling upon a great song. I've created whole scenes that have been born from just listening to that one song. Hell, I've created scenes off of just the openings before.

Music is just one of the most natural ways to make you daydream. That can help you a great deal when trying to weave together your epic tale. 

I've noticed in the past few years that authors are really starting to take notice in how important music is to their books. Some authors go as far as including a list of the songs they wrote certain scenes to in the back of their books as well as others posting entire playlists they wrote to online.

(See, C. Elizabeth Vescio's playlists for The Wasted Series here. I'm a huge fan of them...I MAY follow them already...I do.)

I think that is bitching. 
In the best of ways, of course.

Listening to a song while reading a scene completely changes how you perceive it. Instead of just reading the words and knowing what they mean, music can help you really feel them. 
Was that too cheesy? It's fine!

To be truthful, I wasn't as passionate about this subject until a few years back. I was stuck in the middle outlining--I couldn't figure out how to write climax of the book. That's when Fix You by Coldplay came on. It rocked my effing world. I, not only, wrote the entire climax TO that song but it became the soundtrack for the entire book. It inspired my pants off and helped me work through almost all of the issues I had been facing. Now, I know Coldplay isn't everyone's favorite band and I'm definitely not trying to sell you their albums. I'm just saying that listening to music while you write can really make a big difference in your inspiration levels.

Give it a try! Link your playlists in the comments or tell us YOUR favorite song to write along with!

Here's my writing playlist to the novel I'm working on now. Enjoy!


-Tyler Anne (aka Chick Tyler)

Top photo can be found here.

Advice from a Newlywed: Money Merging


Being a newlywed is obviously pretty wonderful, but I must say that the merging of two lives keeps things really interesting. 

Joseph and I were friends a long, long time before we ever dated, so we've spent a good amount of time in each other's spaces. Whether we're just used to each other or mesh well, we haven't had any weird issues with living in the same (very quaint) home. 

One of the areas I'm sure all newlyweds have fun tackling is the merging of money! 

Dealing with finances is already "fun" enough for one person, and blending new sets of bills, new incomes and new ideals can make things extra spicy! 

In all honesty, this isn't a big point of contention for us or anything, but it definitely forces us to practice some communication and organization skills to avoid trouble.

We've only been married two months (in two days from now), so I won't claim to be an expert on couple financial management, but in our two months we have learned some methods that have been really helpful to us, at least at this point.

1. Details! 

This sounds bad, but I never actually made a formal budget for myself before marriage. I mean, that doesn't mean I just blew my money all the time, but I  always kept track in my head of what money was coming and when and what I needed to pay. Since Joseph and I haven't mastered telepathic communication (YET) this method no longer works. We made this bill organizer that is helpful, but we've since found it's even more helpful to make detailed lists that include what bills we pay with what paychecks and when they are all due. We keep it on a shared Google doc so we can both update it with any extra income that flies our way (which does happen since we freelance). 

2. Prioritize

Some things are easier to prioritize than others. For example, we don't want to be homeless so we pay our rent on time. We also like having those modern electrical conveniences, so utility bills are good. Due dates definitely make priorities for you, but sometimes when paychecks don't exactly match up with due dates, you need to make decisions. Not only this, though, there are plenty of non-bill items a couple is going to want to spend money on. Right now, we are working on fixing up our office, so there are expenses that go with that. Whatever you do, just be on the same page about what is important in terms of spending and if you aren't there, get there!

3. Be Flexible

You can plan all day long, but sometimes there are things you just can't account for, like a flat tire. (We haven't had this happen yet, but boy a few of my tires look questionable. If you're the praying type, go ahead and lift those bad boys up!) In all seriousness, though, something we talked about in marriage prep was how much each other could spend without telling the other person. It makes it so I don't have to call Joseph and tell him I'm buying a cup of coffee or something minor and vice versa. Also, it's great if you can give each other allowances so to speak for those items you might not see eye to eye on (like us girls buying another pair of shoes or something!) 

4. Learn as You Go

We are still in this process for sure, and I have a feeling it's probably a lengthy journey. Having to communicate your wants and needs and document your spending habits is a GREAT exercise in not only bringing you closer as a couple but also just paying really close attention to how you spend your money. 

If you haven't gotten married yet, I recommend laying this all out on the table ahead of time, so that when you have that first month of bills together, it's not such a confusing ordeal. If you are married, do you have any funny money management stories to share? It's just so fun how different guys and girls process things sometimes!

—Holli Anne

Tuesday, April 23, 2013

Writer Talk: Over-sharing & Under-sharing


Over-sharing, under-sharing and letting you know about the apple on the table 


Hello, my name is Tyler and I’m an over-sharer. Don’t want to know what I had for lunch, how it made me feel, and what I thought about while I ate it? Then don’t talk to me after lunch. I am a bottomless pit of talk and I’m not afraid to let my words fly.

I’m not ashamed of this particular personality trait, however, when it comes to writing it can be a bit of a problem.

I have read hundreds of books that walk the line of over-sharing and under-sharing details and books that have fallen in between. I know that giving too much information can be as bad as not giving enough. I want to know what the main character is thinking as he sees the city for the first time but I don’t need to know every single detail in the building to his left or the storm drain next to his feet. On the flip side, you can’t tell me that this is his first time to the city and then let him just walk down the street and into a nondescript house without a new thought in his head.

Getting the details just right is a balancing act in any story you write. At times, it’s a struggle for me to pull in my description reigns because I want need the reader to not only understand my story and characters but to see them as well. As the author I will always know 110 percent more than the reader about my story. I know why she bounces her leg whenever it storms. I know that the police station has a leaky basement causing the captain to have a series of hellish allergies. I know that, after the book ends, Mary is going to have a daughter and name her after her estranged sister.

Some of these details enhance the story; others just distract from it and enable over-sharing tendencies. Unless a detail furthers the readers’ understanding of a plot or character, really think about if it should be in there at all.

I’m going to use a very obscure book as an example of over-sharing.

Jude the Obscure (by Thomas Hardy) made me want to become a character in that book just so I could punch Jude and tell him to stop thinking about nonsense all of the time. You don’t have to know about the plot to know that dear ole Jude couldn’t walk a damned step without analyzing everything around him, how it all made him feel, and at least two flashbacks into his past. If I hadn’t been forced to read it for school I would have put it down within the first chapter (and I normally ALWAYS read past the first chapter).

Sure, some thoughts were relevant to the story. He questioned the love of his life, the way the city made him feel, and a bunch of other important who-am-I issues. However, he also described a ton of things that wasn’t worth a damn to him, me, or the story. Now, I know for a fact that some people insanely love this book (awkward moment: trashing this book to your professor before realizing she did her dissertation on it) and that’s good and all but they can’t deny it is, at best, long-winded.

You don’t need to write out everything that your character feels and sees and smells and touches because you love your story. You automatically know more than anyone about your story and you should keep it just like that. Your story, no matter the plot, is an extension of you and you need your secrets. Sometimes I tell you more than you need to know about my main, sometimes I don’t tell you enough to put together who-done-it, and sometimes I just want you to know there’s an apple sitting on the table.

At the end of the day it’s still your story. You can over- and under-share all you want, just remember that there are people who will put down your book in a heartbeat if you abuse either option. Don’t make them compare your story to Jude the Obscure.

-Tyler Anne (aka Chick Tyler)

Tuesday, April 2, 2013

Homemade Art

Recently, I've done posts about infusing YOU into your space and how creatively de-stressing can be wonderful. THIS post is all about combing the two plus adding the note that homemade is fantastic.
I'm a big DIY fan (search our DIY posts here) so, in turn, that means I'm a big homemade fan. Right now, I've been trying to put more ME into my newest home space while also staying stern with my budget. Luckily, I've found that painting small, wooden squares (though you could definitely use canvas) can make my eyes happy while keeping my money in my bank account.

It all started with my herringbone art. I loved the outcome so much that I made a second panel in shades of gray (not 50, though). I also decided that I liked the color in the first one so much that I made two ombre style pieces. 

I started with a little bit of black in my base color to make it dark. I made that my bottom layer. For the rest of the layers I added a little white in each coat to make it lighter!

Lastly, I really wanted a yellow-something. I didn't want to do any more ombre so I painted the whole square yellow (three layers) and added one layer of gold on the top. It looks brilliant in the light.

These five 4x4 wood squares will be a part of some new wall decor for my office! This a very inexpensive and fun project that can help make you love your own space! 

I wholeheartedly suggest finding or coming up with an art project for your home space! If you do find something you would like to share, leave it in the comments!

-Tyler Anne (aka Chick Tyler)

Tuesday, March 26, 2013

Infusing YOU into your Space


During college I lived in a dorm for three years and then a tiny, CO-ed apartment for the last one. During those years I wasn't dreaming about my dream home or even what that might look like. I had enough sense to know that I wouldn't be living it up in my customized home space as soon as I got my diploma. Since then I have lived in about four different spaces (some very small, some not so much) and I've pinned over 1,000 pins onto my #hgtv board marking tons of spaces I like.

Now I live in a space that is beautiful. However, it's missing a big chunk of me. The pins I see of finished spaces that I love inspire me and, at the same time, frustrate me. I don't have the money or ability to take this existing space I'm in and make it have boatloads of old and new character. I just can't drop everything and paint the walls gray, pick an accent color, run it through the entire house, build my dream wall-to-wall bookcase, make a crafting isle in the office, change all of the light fixtures and magically make everything hardwood. First of all, I don't have the money for that. Secondly, it truly is a beautiful house and I'm not the only one who lives in it. Just because I have endless ideas about how I would like the house to look doesn't mean I should do an overhaul.

I want my dream space but, right now, that just isn't going to happen.

So, where do I go from here?

Baby steps, people! Sneaky, baby steps!

Start small and buy pieces of art or functional accents to make your space feel special and more like you. It may not bring that room into dream status but it will help you feel happy! If you don't want to purchase any odds or ends, then make your own!

That's what I did with these two succulent planters!


You see, the large window in the bathroom is beautiful. However, it always felt like it was missing something. I'm a lover of succulents so I immediately thought that putting a few there would make all the difference, but I didn't want to buy any. I wanted to make them!


I had an old spray paint cap that I washed out and took a hammer to the inside to clear out the bits of plastic that were standing up. I had to be careful though so I wouldn't crack the cap's outer plastic. I removed the succulent from its plastic container and then BAM! done.

I love love love playing with clay and thought it would be neat to make a mini vase for succulent number two. I made it with oven-bake clay (a clay planter DIY coming soon!) and made sure to seal it up tight.  I made it taller but skinner than the spray paint cap to give some diversity to the coupling.

As of right now, I left the clay the color that it was. I plan on painting it later in the week!

It's not a huge room makeover. It's barely an addition. However, these two self-made planters make all the difference for me in this space.  

Remember, you may not have your dream space yet but you're almost there! (See what I did there?!) Work with what you have but don't just give up if what you have isn't a lot. Beautiful things aren't always found in stores or with big price tags!

So have fun with your space!


-Tyler Anne (aka Chick Tyler)

Tuesday, March 19, 2013

Advice: Creatively De-stress


I tend to over stress when I really just need to relax. I can't always help it. I'm always trying to find new ways to conquer stress--a way to relax while also staying creative.

I'm happy to say I've found that in clay.


Honestly, I used to hate any activity that was clay-related. I'm not the most patient person in the world but one day I bought me some SuperSculpey and jumped right in. Now when I want to unwind but still work with my hands, I bust out the clay.

This newfound technique has become an under-the-table passion. Not only does it help me de-stress but it also helps me focus and work on being more patient.


So, what's the point of this post?

Easy! Find an a creative activity that helps you de-stress and go for gold! Make it a separate affair from your work and hobbies. Get something that puts NO PRESSURE on you. It doesn't have to be a beautiful outcome--it's the journey that matters.

You never know! One day it may become more than a way for you to de-stress! (I may be working on a little clay project for Almost There! But only as long as it helps me de-stress!)

My fish A, snail B, and tiger C makes me oh-so happy!

-Tyler Anne (aka Chick Tyler)

Friday, March 8, 2013

Wedding Stationery: Thinking Outside the Box

This post comes from one of our #hollicon partners, Laurie at Wiregrass Weddings. Wiregrass Weddings is a wedding stationery business, making awesome things like wedding programs, invitations, table numbers, menus...you get the idea. They made my wedding programs, and they make cool stuff! Hope you enjoy! —Holli Anne


In the wedding paper business, I get to see a lot of creativity everyday.It's not only in the work we do, but many of our wonderful clients come up with some pretty fun designs.

You good readers of Almost There seem like you are pretty good at thinking outside the box, so that's what my post is on today: What you can do when you don't see exactly what you are looking for.

Wedding programs are the products we sell the most of, but we like to surround ourselves with anything paper: wedding invitations, thank you notes, banners, place cards, table numbers, menus and anything else someone could dream up for their wedding day. 

Whether you are ordering your products from us or somewhere else, here are some ways you can get exactly what you are looking for that you may not see on the site. I'm using the "options" page on our Website as a reference. (Of course, I can't guarantee what other companies will be willing to do but you get the idea!)

1. Paper Colors

We advertise, natural linen, white linen, grey linen and natural astroparche, but have we definitely printed gold and kraft paper wedding programs? YES, we have! 

2. Fonts and Font Colors

Again, we have a certain selection of fonts we offer, but sometimes, you might need something a little different (this is especially true if you are a design nerd). We actually got a new font for Holli Anne's wedding programs so they would match her wedding invitations. The same holds true for font colors. 

3. Ribbon

Ribbon is always a fun way to spruce up and piece of stationery, especially wedding programs. While there are tons of solid-colored ribbons to choose from, there are many a way to put a twist on ribbon. Some of our more vintage brides choose lace or twine instead of ribbon. Others might seek out polka-dotted or other fun-patterned ribbon. 

4. Design

This is where some fun can really begin. Mix and match existing patterns or dividers or add your own twist. If you are a designer yourself, we can even use YOUR designs on your stationery. Imagine that, right? 

5. Wording

This is also where you can make your stationery really scream you, as a couple. While there are many places to search for traditional wedding stationery wording, including our site, there are no rules that say you have to word things a certain way.  How would you say it? Let's just put it THAT way, then!

If you have any other questions about wedding stationery, tweet us at #hollicon and we'll see what we can do! 


Monday, March 4, 2013

Making a Wedding Day Emergency Kit


The following post is a guest post from one of our #hollicon affiliates, Moniek James-
Eldridge. Moniek is an event planner at Distinctive Soirees. You can find her on her Website here. 

So, you big day is here. You’ve been stressed to your highest potential and have had several bumps along the road, but the day is finally here. Your wedding day.

You finally have a moment to take  deep breath and imagine what it will be like when you say, ‘I do, and your thoughts suddenly are interrupted by a the sound of your flower girl crying because she’s fallen and now has a run in her stockings, followed by your maid of honor complaining that her shoes are going to give her a blister, and you just heard that one of the groomsmen has spilled his last-minute meatball sub down the front of his tuxedo shirt. Congratulations!

Fortunately, you have a well-stocked wedding day emergency kit on hand, thanks to your planner. Crises averted. For the brides that need to make sure they are prepared for the worst, below are your must-have items for wedding day emergencies:

  • 1.     Full sewing kit – in the event of a loose button or split seam
  • 2.     Clear nail polish – stop runs in their tracks
  • 3.     White chalk –  to mask stains
  • 4.     Moleskin – for blisters
  • 5.     Bandages – last minute alterations can be dangerous
  • 6.     Pain reliever – for the Drama Queen, er, maid of honor
  • 7.     Nail polish in your shade – freshen up your manicure
  • 8.     Double sided tape – for wardrobe malfunctions
  • 9.     Adhesive hem tape – stop loose hems in a snap
  • 10.  Snacks/antacid – nausea doesn’t look good on anyone

There you have it. With these tools at your disposal you can take on anything that comes your way on your big day, and have time to tuck your cape in and be cool, calm, and beautiful as you walk down the aisle.

HAPPY WEDDING ;-)

If you have any wedding planning questions you don't see here, Tweet us at #hollicon and we'll answer you on the blog! —Holli Anne

Ways to Save on Wedding Invitations + Some Fun Designs


I realized earlier today that I've never blogged about our wedding invitations, which does seem a little crazy considering you are ALL invited to our wedding via instagram (#hollicon). 

Our wedding invitations were one of our big money savers. Also, they are one of my favorite details, generally. I love that slab serif font, our colors and definitely the style of it all. 

I think it does a great job of showing our guests what kind of event they'll be attending. 

They were designed by my fiance, Joseph Melancon, which obviously helped us save some cash. An even bigger bonus is that he works at a print shop, so we were able to get the invitations at cost.

We used red envelopes, which I ordered from Wiregrass Weddings, one of our #hollicon partners. 

While everyone might not have the luxury of an in-house graphic designer or the close-connection to a print shop, I do think there are some key things we did that could help everyone save money on invitation costs. 

1. Keep it simple

One page, front and back. We investigated doing some awesome foldout invitations with lots and lots of fun cards and information. They are definitely awesome. But not only will the design and printing cost more for a big package, but the shipping will, too. The heavier the envelope, the more likely just one stamp won't be enough. 

2. Electronic RSVPs

We debated over doing things the old-fashioned way and including a stamped response card and then we decided not to do that. Why? Many of my married friends tell me they never get them back in the mail anyway. So, while it's nice to support the post office and all, we opted with the e-mail, phone call RSVP option. Yes, I did have to track down some people in the end, but so have all my friends who included response cards. If I were doing it over again, I would have done things exactly the same way.

3. Price scout

Definitely consider the different services you need and shop around. Go with quality and find somewhere that matches that price-wise. (I, of course endorse Wiregrass Weddings). But I also endorse doing a little research and penny pinching. It may take a little more time to save money on your wedding, but this tip should translate to ALL your wedding details if you want to keep that bottom line low. 

4. Avoid fancy

Don't confuse this with me saying "avoid classy." There's a lot that can make even formal invitations look sharp. But, when you want to pinch pennies, stay away from hand-drawn calligraphy (or hand-drawn anything) and letterpress. There are ways to get similar looks by using graphics and in some printing techniques. 

There are plenty more ways to save, but I'm not going to pretend to be a print expert either. These were just the elements we used in keeping our costs down and would have especially used if we didn't have the print shop connection.

Do you have any other wedding invitation questions? Tweet to #hollicon or comment below and we'll get you an answer!

—Holli Anne 

Tuesday, February 26, 2013

Home Details: Office


Not many people know, but I've moved into a new house. I could fill up a book with my complaints about the process of moving however, this time around wasn't too bad. Everything I own fits into a 14 foot Uhaul. This new change in my life has inspired me to create a photo home series called Home Details. I want to chronicle the beginnings and works in progresses in this new home.

Right now I'm in the middle of setting up my office. It's fun and also a pain because of all of the random, non-matching things I have. It'll be a few days before I get everything in its proper place but I went ahead and put some time in making one part of the room comfy, fun, and useable so the office doesn't totally look like an explosion.

Below is what I can see from my desk chair.

It may not look like a lot but, for now, it's enough to make me happy. (Plus, I've gotten some compliments already!)

The picture at the beginning of this post shows a close up of the wall decorations I felt worked best with the randomness of the items I have in the office.

Because I don't have a true color scheme to the room, I wanted one piece of art that tied all of the dominant colors together. I was inspired by Ashley Goldberg's piece (here) to make a "messy" painting.  
From there I decided that I wanted something to balance out the visual weight of the painting. Luckily, I held on to this old mirror from a little shop back in the day.

Since I'm such a fan of triangles I wanted to top off these two pieces with something unique. That's when I ran across this plate! I instantly fell in love and drew my own version of it onto a manilla folder (I didn't like the white of printer paper) and put it in a $3 Dollar General frame.

I used the same orange paint to outline the crusts as I used in the painting. I carried his orange over to make a stripe down the mini cork board that was first in the middle panel. I wanted two more pieces to complete the panel and I wanted them to be unique. That's when I found my mini piñata (a very fun late night DIY!) and a little clay coffee cup I made for fun. Since the piñata already had orange in it, this worked out well!

I'll add more to this wall in the future, but for right now I'm just tickled about it. It's random chic, I say!
Now, to the rest of the little details that make this portion of the office warm and fun!

I hope you enjoyed! Stay tuned for more Home Details!

All wall decor was placed on the wall using Command Strips. They are awesome.

-Tyler Anne (aka Chick Tyler)

Thursday, February 21, 2013

Simple Tips for Creating a Guest List


When I first started planning my wedding, I pinned some cool tabs that had things like "Wedding for under $500," or another "Under $6,000." 

Those both seemed like numbers in between what my budget would be (see, I never really sat down and made one of those). 

But when I started to read the advice, both of their budgets pretty different in size, I was discouraged because their tips called for a lot of compromise. Luckily, I'm stubborn as hell, and decided that I would do no such thing. I was having a big wedding, with photographers and food and dresses and flowers for a good price. Less than $3,000 and 3 weeks from a wedding, I am happy to say this is happening! 

Since most of the costs do come down to how many people you invite, choosing your guest list is a pretty important element to planning a wedding (or any event for that matter). There are tons of tips out there for helping you draft a guest list, but I'm going to share what worked for us! 

1. Consider the obvious: Venue space, etc.

Some people draft their guest list before choosing their wedding and reception venues. We did it the other way around. Partially because I knew what church I wanted to be married in and partially because we got a deal on our reception hall. Our chapel only holds 250 people, so that gave us a concrete reason we couldn't exceed the limit. 

2. Only invite people you know. 

This seems obvious on paper, but for people with big, southern families, sometimes  there are literally people in your family you don't know. This is the case for my fiance, so we decided it would help us narrow down the list. 

3. Only people you keep in contact with or have talked with in the last year.

When we first drafted our guest list (including the names our parents gave us), we came up with close to 400 people. This tip really helped us narrow the list down. When it came to some family that we are just plain bad at communicating with, we bended a little, but some friends that we had from high school and college that we just don't talk to, didn't make the cut.

4. People we think will be a part of our lives.

This was a big one, as well! It gave us a chance to really evaluate our friendships and see who we think (and hope!) will be a part of our lives for years to come. If they fit in this category there was a good chance they were at least invited to the wedding. This didn't really include our current and past co-workers though. We love them and want them to be part of our lives, but we also just HAD to keep it within the personal life circle for numbers sake.

5. Allow some leniency for keeping the peace.

Let's be real. Our parents are helping us out a ton with this wedding, and not only that, we just love them generally. So when our moms had some best friends they wanted to invite, we let it slide. 

6. Make a mission statement and stick to it.

This is the public administration side of me, but I felt we just couldn't start planning our wedding without a clear, written mission of what we want this wedding to convey. So we did that, not necessarily to show anyone but just to remind ourselves what we wanted. This played a role in who was chosen and just economically how many people we could have join us.

7. Limit the children.

I'm a Catholic, and I love me some kids! But in order to allow for more people, we limited the children invites to just our closest family. Some of the Catholic families I am inviting would easily add another 7 to the list. We were also lenient on this to some extent. Like if some of the parents had some little ones that were particularly attached to mom and dad, we of course are allowing them to come. 

8. Don't be petty.

We aren't one of those, "We have to have equal people on each side of the church." In fact, we aren't doing a side of the church type thing. We are uniting as a family, after all, not competing with each other for who has more loved ones! 

These are just some of the things that helped us out. If you have any more questions about drafting a guest list, feel free to comment below or send me a message with #hollicon on Twitter, and I'll address it for you on the blog! You can find more #hollicon posts here. 

—Holli Anne 

Online Shopping: Bridesmaid Dress

Three bridesmaid dress rules you can (and we did) break:

1. You have to have each bridesmaid in the same dress (make, color, etc.).
2. They should all be purchased from the same store.
3. Stay away from purchasing your dress online.


I'm not getting married but it's #hollicon time and that means time for me to buckle down with my bridesmaid getup. This is my first time as a bridesmaid so I'm nervous about wrecking THE ENTIRE WEDDING! But, surely I can't do that?

Luckily, it's Miss Holli Anne getting hitched. Therefore she's the outfit commander--the yay or nay sayer. Now, why would she say yay or nay if she was just picking out all of our dresses? Because Holli is creative and has decided to just give us her wedding colors and let US pick out our wedding swag.

She gave us a few guidelines to follow (for instance, no white in the dress) and left us to our own devices.

I found that there is such a thing as too many options. The world was my oyster but I didn't know what to do with it. Also, I'm on a budget which made things all the harder.

Until I remembered that I follow the blogs of some of the coolest online clothing stores that had the same "feel" as Holli's future wedding.

Here are four sites I completely recommend for shopping everything wedding on a budget:

ModCloth
ChicWish
Ruche
Sosie

I wanted to find a teal dress (one of my favorite colors) so I cracked down on these four sites. Finally I found and fell in love with this beauty.

This Lucky Star Pleated Dress is beautiful, fun, and can be used more than once. I am beating the stereotype of having an awful bridesmaid dress that I will throw in the back of my closet after the wedding. This dress is something I can and will definitely wear after the wedding. That was a very important aspect of Holli deciding to go the less traditional route in bridesmaid dresses--she didn't want us to spend a lot of money on something we'd only wear once! 

I must say I am beyond happy with Ruche's quickness in mailing the dress to me (it took four days and I didn't pay for fast shipping). Not to mention the packaging was too cute! (I would show you but it will be cropping up in a future DIY!)

I still am shopping for shoes (they get to be red!) and accessories. Where would you suggest I shop? Is there an online store that you just absolutely love?

-Tyler Anne (aka Chick Tyler)
#hollicon is an ongoing wedding series. If you have any questions on choosing color combos or any other wedding topic, Tweet them with #hollicon and we will address them on this blog series! 


LinkWithin

Related Posts Plugin for WordPress, Blogger...
Pin It button on image hover