Almost There: wedding
Showing posts with label wedding. Show all posts

Wednesday, May 1, 2013

Feeding a BIG Wedding on a Small Budget


I have to start this blog off with an apology. During our #hollicon series (where we posted about my big, inexpensive, DIY, fun wedding), I neglected to answer one reader's questions about wedding food. 

I had a caterer scheduled to blog on the topic, but she was unable to last minute, and well, last minute I was all getting ready to walk down the isle and didn't get to it myself. Please forgive me, reader(s)!

Anyway, I thought now is as good as any time to talk about wedding food, first mine, then some other ideas I chose not to use for various reasons. 

First things first, our wedding ended up being about 175-200 people and our budget came in right around $3,000! The food costs were the parts we worked really hard to keep down so we could convince my parents that our guest list wasn't too ambitious. 

I didn't want a straight up potluck, but I also knew that hiring a caterer would be completely out of the question for what we were trying to achieve. We also opted to have a 4:30 p.m. wedding, putting our reception right at dinner time, so finger foods weren't really an option. 

What the heck did we eat?
  • Popcorn Bar for pre-reception snack
  • Make your own sandwich bar
  • Soups in crockpots 
  • So. Many. Cakes.

The popcorn bar: This was really pretty simple. It turned out the venue we used had a popcorn machine that we could use. (They also sell popcorn machines for about $40 at Walmart/Sams Club/Party Stores). I bought various popcorn seasonings to spice things up: Ranch, white cheddar and Tony Chachere's for the Cajun flavor. I found popcorn bags at Sam's Club for $5.72, making this total around $15.

Make your own Sandwich Bar: We really lucked out here and found a caterer who let us order quality sandwich meats and cheese at cost to her. Boy were they amazing meats, too! The meat (turkey, ham and roast beef) and cheese (provolone and cheddar) ended up costing us around $150! Then I spent about $250 at Sams Club on various rolls, plates/cups/utensils, coffee, tea, garnishes for the sandwiches and breakfast foods and snacks for our wedding party. I spent another $15 on some higher end mustards and mayonnaise at Publix. Total sandwich bar costs: $415.

Soup bar: This cost me $0. We chose to ask a few of our closest family and friends to bring a crockpot full of soup as their wedding gift to us. We ended up with around 10 different soups that were oh, so tasty! Jambalaya, Gumbo, Taco Soup, Potato Soup, oh gosh, so many kinds! We got huge compliments on the variety, and no one said anything like, "Oh, that's tacky how you potlucked that!" 

Cakes: We decided instead of one big wedding cake, we wanted a bunch of regular sized, homemade cakes. This was less out of wanting to save money and more out of, "We love so many kinds of cakes we can't decide!" Plus, we wanted our reception to have a dinner party-type feel to it. We actually had Joseph's grandma and my mom volunteer to make several; I made several (just because I like baking); and we had a couple other volunteers make some. We ended up with 13 cakes, and people ate that up (both literally and figuratively!) 

In total, it cost us under $450 to feed around 200 people. That includes drinks, utensils, plates, bowls, etc. 

This is how I managed my food costs, but I had plenty of other ideas before I settled on this one. Here are just a few tips on cutting wedding food costs that may inspire you:

1. Order food from a wholesale store

If you can get food at cost or close to at cost to you will save a lot of money. Another idea we had besides the sandwiches was to bake chicken or to make a pasta-type bar. This is all contigent on how many people you have to volunteer and what your venue space allows.

2. Seek volunteers

This was so important to us keeping our food costs down. We had a large family that volunteered to orchestrate our entire set up of the food, and they were extremely essential. Obviously us and our parents were a little occupied pre-reception. Ahead of time, the caterer we ordered food from recommended about 3-4 people helping with preparation. We also had tons of volunteers cook soups and bake cakes for us. This normally isn't too difficult because usually surrounding weddings a lot of people will come out of the woodwork and say "Is there anything I can do to help?" That's when you come in and say, "Well, actually…"

3. Consider a restaurant

To keep costs down, you could still order food from a restaurant, but you wouldn't necessarily have a caterer. For instance, you could order BBQ or a giant container of tacos from a Mexican restaurant. I don't know what all you could order, but you know what restaurants are nearby!

4. Hearty/Inexpensive meals from a caterer

Hiring a caterer isn't a terrible idea! Don't think I'm hating on the business over here. In fact, we actually didn't try this route ourselves. Though, I'm sure if you have a budget, you could take that to a caterer and say, "What can you do for this amount of money?" Large pans of pastas or salads (or pasta salads) are some dinner type foods that are pretty inexpensive. You may also opt for some finger foods/Hors d'oeuvres if you aren't having a dinner time reception. 

5. Alternate reception times

This all depends on your hopes and dreams (and venue availability) for your wedding day. While we opted for a dinner reception (because our wedding was on the bay and we really wanted to be there for sunset), you obviously don't have to do this. If you do have a different time, you can easily cut your costs. For lunch, you don't have to serve as hearty of meals as you do for dinner. If you have an afternoon reception you could just serve some finger foods (which are super easy to potluck if you choose that route) or you could even have a late night reception and just serve dessert (um, delicious!) One of my favorite things I've heard is a brunch reception, following an early morning wedding. Breakfast casserole or pancakes? Yes, please! 

6. Utilize your culture

Say you don't want to have potluck because you don't want your guests to bring food or any other reason you have. Well, there's a way to bypass the general potluck appearance and actually pull it off in classy fashion (besides my incredible soup idea!) Instead of asking everyone to potluck, maybe use just your families and serve foods based on your culture. People love cultural foods, and chances are, your families love cooking them! 

7. Potluck

I mean, I just sort of bashed potluck in the last point, but I'm not really against it. Have you ever been to a church party? I mean, that junk is amazing! People participating in your big day would be more than happy to bring a dish, most likely. You could ask everyone or you could just ask a select few. Either way, variety and homemade meals are not usually a bad combination, so don't be afraid to go this route if you want to cut costs! When I chaired a church social committee one time, our parties often consisted of us providing the meat and others bringing sides and desserts. This is another way to handle that. The partial potluck!

8. Just say no…to alcohol

This one was easy for us because we don't really drink. Also we are frugal. But the open bar can get out of control expensive, and even the just beer and wine selection (though less expensive, for certain). Even if you don't want to ban alcohol completely, you could let your guests know they can bring their own booze. That's a common thing that happens at parties, so it's no big deal if you want to do that for your wedding.

9. Don't be afraid to bend the rules

Most of all, this is YOUR day. If you want to serve cake and punch only at high noon, well, that's your prerogative. If you want to go all out at 2 p.m., you also can do just that. If you are bending tradition too much (like if you are only serving cake at lunch time) you might want to give your guests a heads up about that on the invitation, so everyone's not starving and mad. But most of all, just make this day all about what you want and don't compromise too much!

I hope some of these tips at least get your ideas flowing. If you have any other questions that are more specific, I'd be glad to discuss them with you. Comment below or e-mail us at chasingthere(at)gmail(dot)com with the subject "Wedding Food" and I'll get back to you ASAP!

—Holli Anne

Wednesday, March 20, 2013

Oh hey, I'm married!


So…I got married! If any of you are regular readers, I know you've seen all about it in our #hollicon posts. (Thanks so much for following those, by the way!) Since I'm done honeymooning and have been absent for a little while, I thought it would only be fitting to share some of the highlights of my big day! 


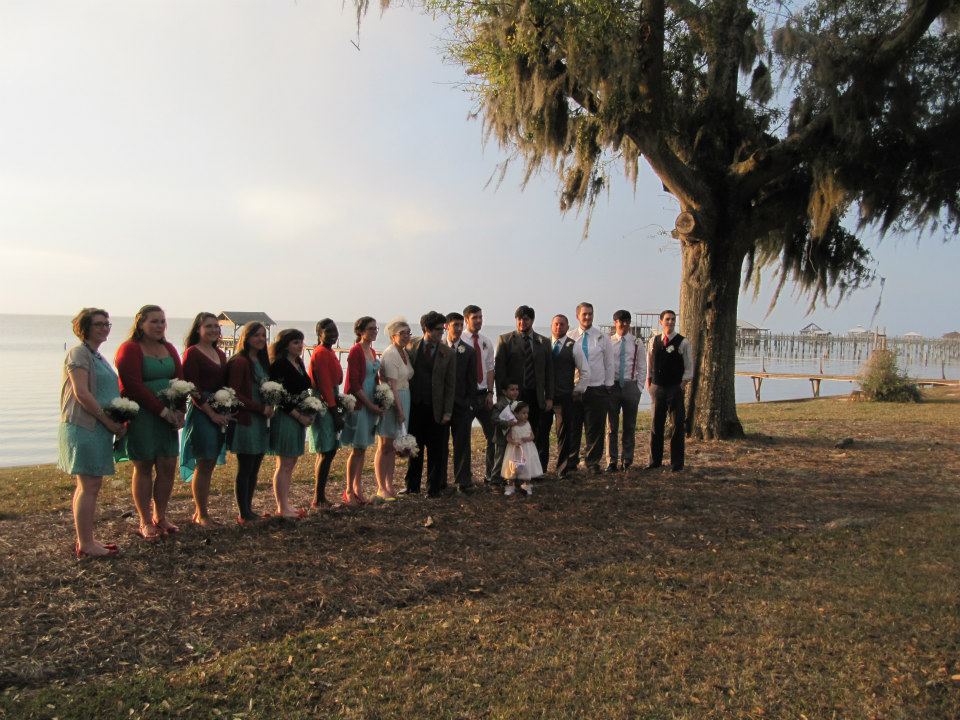
The venue: Our March 9, 2013 wedding took place at Sacred Heart Chapel in Point Clear, Alabama. It's a beautiful historic chapel on the bay, complete with big mossy trees and a giant bell tower. I grew up in this area and have always been in love with this place, so a 4:30 p.m. wedding in March on the bay made for perfect weather and ended just in time for some gorgeous sunset pictures. 


The food: We wanted a big wedding but wanted to keep our costs low. We fortunately found a caterer sweet enough to let us order quality sandwich meat at cost to her. We also wanted our food interactive. So the menu: popcorn bar with different seasonings, make your own sandwich bar, more homemade soups in crackpots that I could count and the same thing with cakes. It ended up being really homey and delicious, which is all we really hoped for in this thing! Oh, and our rehearsal dinner was a crawfish boil, so that was the best thing in the world!


The outfits: Well, we talked about our bridal party mismatched outfits before (here). The run down: girls wore teal dresses, cardigans and red shoes. Guys wore grey or black pants and red or teal accessories (tie, suspenders, etc.) Me and Joseph…well we're in the center of that there picture!


The reception: We know that weddings are about the bride and groom and obviously that's what people are there for. BUT, we wanted to keep it as much like a dinner party and as little like a spectacle as possible. It's just our style. So we use items we thrifted for the last six months to make centerpieces and set up an atmosphere much like the way we would decorate our house. I really love how everything came together. We also tried to make our reception atmosphere interactive, too, with paper tablecloths people could color on and board games for playing!


Favorite decoration details: I loved everything as it came together, but I think my favorite stand alone decoration was these signs my husband designed for us. We set them on easels around the reception hall to mark the different areas: "Play, Eat, Dance, Give." Am I going to hang them in our house? You bet your booty I will! 


Favorite ceremony moment: Do I have to have just one? Because I have a three-way tie. Since I wrote the categories, I'm fine with breaking the rules. I LOVED looking at Joseph as I was walking down the isle, realizing I was REALLY getting married. My best friend from high school is a Deacon, so he gave the sermon, and that was absolutely a beautiful experience. (I cried during these first two moments). My other favorite part was that when we were exchanging rings, I grabbed Joseph's right hand. After that, I was so distracted by the fact that I didn't know where his left hand was, that I didn't notice for a minute after the Priest told me to repeat, "Joseph take this ring…" Yay for awkward silence!


Favorite reception moment: Joseph and his band mates from Jam Therapy (his band, where he's an awesome drummer) surprised me with a song! Joseph sang this lovely Beatles love ballad. He's so swell at singing, and these guys are amazing, too. Check them out here if you desire...


The honeymoon: We decided not to plan a honeymoon ahead of time. I mean, we had just planned a whole wedding, so we were kinda structured out. So, Sunday after the wedding, we woke up and decided to go to Nashville. We didn't actually leave until the next day, but then we spent three nights there and one night in Atlanta so we could hit up furniture heaven, aka Ikea. 


Best thing about being married: Having a family of my own is the best! We both feel like we have a new sense of purpose. Things are not just about us anymore. And let's be real. A lifelong sleepover with your best friend ever…what can be better than that? Thanks childhood friends for all the preparation! 

—Holli Anne

P.S. I've changed all my social media names to reflect my new last name, now. Check out my @holli_con Twitter, Instagram and Pinterest

P.S.S. You can see most of these pictures and their owners at the #hollicon search on Instagram

Monday, March 11, 2013

Instagram Wedding

Holli got married on Saturday. It was beautiful. We'll have a post about the wedding and the reception soon, but this particular post is about Instagram + weddings.

I used to run a blog (Social Spaz) where I talked about social media and networking sites. I'm kind of addicted to online media so when Holli and I hatched the concept of "#hollicon" I was way excited. See, we wanted everyone as pumped as we were about the upcoming nuptials as well as an umbrella term for everyone attending to use. Starting on Friday, I started Instagraming with the tag #hollicon. The wedding party and Holli were on board too and it became an affectionate term that we would say while rehearsing and decorating. Holli even used the #hollicon logo in the reception's decoration. The MC made announcements to #hollicon! As of now, over 100 pictures were uploaded to Instagram using the #hollicon tag.


At first I thought it was just a fun idea but now I see the potential behind creating a term to tag on Instagram for your wedding and reception. Holli can now search #hollicon and see what her friends were doing and the different pictures her and her new hubby were caught in. She doesn't have to worry about being texted or emailed pictures--she can just use the search option on Instagram to get a category filled with her lovely day's pictures!

So if you're about to get married, considering coming up with an easy to remember and spell tag that represents your love! (Holli + part of her new last name.) Then make sure people know what to tag and then give them free reign to snap some pictures and upload to Instagram!

Also, if you haven't seen #hollicon on Instagram yet, go search it under Tags!

We hope you enjoyed the ride (and continue to enjoy it since Holli is honeymooning still)! We can't wait for the official pictures to show you how awesome the DIY decorations and vintage-style fashions that were rocking out at #hollicon!

Follow me @socialspaz & Holli @hkeaton!
-Tyler Anne (aka Chick Tyler)

Friday, March 8, 2013

Nailing Down Perfect Wedding Day Nails

This guest post comes from one of our #hollicon partners Theresa Kiernan. She's an amazing nail tech and also happens to be one of my best friends and bridesmaids. She talks about things you can do to keep your nails healthy leading up to the wedding and how to do them yourself if you are trying to cut costs. —Holli Anne


I am so excited about Holli’s wedding! This is the first time I have had the honor of being a bride’s maid, but not the first time I have done wedding nails. I am so excited and honored to do Holli’s nails for her wedding. Today I am going to be talking about how to take care of your nails as you prepare for the wedding and how to do a beautiful, classic french manicure for the big day.

Hair, skin, and nails are where your stress is first displayed, so it’s important to keep yourself well rested, hydrated, and relatively stress-free. 

Pre-Care

To care for your nails leading up to the wedding I would recommend filing them so they don’t randomly catch and break within the hustle and bustle of wedding planning. Also, one of the greatest products for nails is cuticle oil. 

The oil helps to keep your nails hydrated and healthy. It’s amazing how they help brittle or damaged nails. If you have acrylic nails, applying this product daily and buffing your nails helps to keep them strong and healthy. I use Arbonne’s Cuticle Oil, but really any quality cuticle oil will do the trick. 

Polishing

Once you have prepped and cared for your nails, you are ready to polish them for the big day! If you don’t have much money and are doing it yourself, here are some tips and tricks to pull off a classy, feminine look.

You want your nails to be well-maintained, especially as everyone is going to be looking at the new ring, but you don’t want it to distract from the ring and outfit. I would recommend some form of a french manicure because it is sharp, but not over dramatic. There are a few ways in which you can achieve this look, one by using a guide or sticker and the other by using acetone or nail polish remover. Either way you will need a base coat, top coat, white nail polish, and a pink polish.

The Sticker-Method

If you want to use the basic, sticker approach here is a helpful tutorial I found on YouTube: Easy French Manicure. You don’t have to cut your own tape if you don’t want to, you can use some prepackaged guides or even 3 hole reinforcers. If you use this method make sure that the white nail polish has dried before pealing it off so you don’t smudge or peal it all off.

Another Method

Another method is to paint the white on your tips and to go back with nail polish remover to create your own smile line. This is for the more artistic-minded brides. There are a few tutorials I found that are helpful including How to do a Perfect French Manicure and a longer, more thorough tutorial entitled How to do: French Manicure. For this method you will need nail polish remover and a brush. If you use a brush I recommend a rounded brush like the one in the second “How to”, because it helps create a perfect, rounded look. I often use Q Tips instead of a brush to make my rounded edges. They work well and I highly recommend them.

Adding Flair

Now if you want something with a little more pop for your wedding, there are a few simple things you can do. Nail Polish Stripers are always fun to add a little design to a nail. The brush is a simple line and one way you can use it is to add a simple line underneath the white. It achieves a very nice look. Also, I like using nail stickers. I have some simple flower stickers I bought years ago that I add to nails for an extra pop on special occasions.

Holli Anne's Nails

For Holli’s nails we are using gold glitter for the tips instead of white. These are some of the inspirations we had for her nails. They are not your classic white tips, but they definitely fit her personality for the wedding. What ever you end up doing make sure you feel comfortable with it. There’s so many fun things to do with nails.

 If you have any more questions about nails be sure to tweet them to #hollicon and I’ll be sure to answer them!


Wednesday, March 6, 2013

#hollicon: It's Getting REAL!

Today is the first time I feel like the "crazy" hit. Not the "Oh, I'm crazy," type thing, but more so just the people are starting to get here and there are so many details-type deal. Don't get me wrong, the whole last couple weeks have been steadily busy, but now, phew! Things are getting done!

So, I haven't yet posted all my DIYs, but they aren't all quite photo ready just yet. Don't worry, though, I'll have PLENTY to show over the next few days. In the meantime, here's a roundup of what I've been up to last night/today. You can watch me go through the process the next couple days on my Instagram, or of course, I'll be here when I can. Two days to go!


DIY Glitter Cake Toppers. I can't WAIT to show you the final product here.


A little wedding reception signage for our guestbook.


Fuel, of course!


My wedding day shoes from Modcloth came today. I LOVE THEM. And of course I had to wear them around the house to break them in.


Just a few flowers my Aunt and I threw together for inspiration this afternoon. We'll see how the real thing turns out!


And one of my best friends arrived today so we had some pillow talk and my favorite chips.

Tips for Making your Wedding YOU

This guest post comes from one of our #hollicon partners Chelsea at Crazy Love Studios. She's amazing! The end. Hope you enjoy! —Holli Anne

It’s the little things.


Looking for some ways to add some personal touches, character and whimsy to your wedding, but not too sure where to start?

When working on projects for your big day, here are a few things to keep in mind:

• Keep it simple, yet creative. Some things may be worth a few extra minutes in the long run, but others aren’t. Weigh your options and focus on the least invasive projects or even have them made for you if they are just too cool to pass up. “DIY” is no longer something you actually have to do yourself! It has become a well sought-after style that has brought about many talented artists and creatives whose main focus is making awesome things---for you!

• Be yourself. Don’t do something that’s trending if it’s not your style. It will be obvious on the day of the wedding if your “look” is not cohesive and just a big mess of what you thought were “awesome” Pinterest projects. Stay true to your own style and create meaningful details based on what is important to you and your fiance.

• Form and function. Make sure what you are creating makes sense with the “big picture.” You are wanting to create smaller vignettes of inspiration inside the overall “feel” of the wedding day festivities.

Below are a few of our favorite picks from some of our weddings that are sure to spark your creativity!


1. Rustic centerpieces. We love that even though this wedding reception was indoors, the couple brought in rustic outdoor elements. The simplicity of the glass jar and candles with the slice of a tree stump beneath creates an elegant centerpiece. Oh, and how could we forget the adorable “I Spy” game that the maid of honor created for the bride as well. (Lesson: Use your people! They want to help!)

2. Memory locket. The bride’s father had passed away, but she wanted to have him close to her on her wedding day and walk her down the aisle. What a sweet, simple gesture!

3. Invites and stationery.
It’s a great idea to showcase all of the wonderful stationery you have created for your wedding to document the event. We ask our brides to bring an invite to make sure it is included in the day’s photographs.

4. The bouquet. Make it your own. This was actually a simple bouquet we used for the bridal portraits, but we always love seeing what everyone does! We have seen buttons, brooches, paper, you name it. This is a great place to showcase your personality!

5. Favors. Aren’t these just the cutest? Each guest at this wedding was gifted their very own jar of homemade muscadine jam. It was a practical take-away that also added a fun southern flair of decor since they were brightly colored and displayed in large wire baskets.

6. Food. You don’t have to break the bank to have great tasting and adorable treats for your guests to get their fill of. How adorable are the mason jars filled with sweet tea and topped with little kraft tags? Who wouldn’t want to bite into that jelly-filled, southern-baked biscuit deliciousness? At this wedding the bride and groom’s families rallied together to create a sort of down-home potluck with all types of treats, both savory and sweet.

7. Faith and beliefs. This is a major part of the wedding day to many couples and this one made a nod to the father of the bride by using his own treasured bible filled with family memories to tie the rings to for the ceremony.

8. Boiled peanuts. Sorry, but I just had to include this one! It was also a great take-away for the couple’s southern wedding and folks literally just ate them up! The packaging is what I found adorable. The simple mason jars were stacked on a table, but since they are glass and you were able to see the contents, it added to the decor of their fall wedding.

9. Boutonnieres. (aka “man flowers”) Don’t skimp on the swag for your man’s getup. This couple went with a simple piece of cotton from a nearby field for this southern, fall wedding. It was a perfect touch to the rest of the decor without overdoing it. Besides, who doesn’t love cotton in the south, yall?

To find more of this awesome, check out Crazy Love Studios Website. If you have more questions on personal touches to your wedding, tweet us #hollicon.

Tuesday, March 5, 2013

DIY: Bridesmaids Tote Bags


I probably shouldn't post these, considering they are gifts for my bridesmaids, but I just can't help myself. Plus, I'm filling these DIY tote bags with surprise goodies, so I'm not giving EVERYTHING away. 

I got the idea for doing these from this pin. While I wanted to give my sweet friends a nice present, I just felt too much pressure in trying to pick out jewelry for everyone that they would like. 

Plus, I have a healthy obsession with tote bags and thought my closest friends just might be into them, as well. 


So this DIY is simple. All you need:

  • Blank Tote Bags (sold at craft stores)
  • Paint (I used acrylic, but fabric paint would also work)
  • Paint Brushes


There are many ways to paint these. You could buy or make stencils. I actually attempted to make a stencil heart, but decided that was too much pressure for me also.

I like my crafts to look handmade and slightly imperfect, so I just went for it.

When I was deciding what to paint on there, I wanted to keep it themed around love, but I didn't want it to say bridesmaid. Love lasts forever, but being a bridesmaid is a one-day ordeal!

I definitely have some plans to make more tote bags after the wedding settles and my nesting begins. I despise plastic bags from grocery stores and the ways they creep up in my house and start invading, so this seems like a good option. 

Anyone else out there obsessed with tote bag decorating?

—Holli Anne

Monday, March 4, 2013

Making a Wedding Day Emergency Kit


The following post is a guest post from one of our #hollicon affiliates, Moniek James-
Eldridge. Moniek is an event planner at Distinctive Soirees. You can find her on her Website here

So, you big day is here. You’ve been stressed to your highest potential and have had several bumps along the road, but the day is finally here. Your wedding day.

You finally have a moment to take  deep breath and imagine what it will be like when you say, ‘I do, and your thoughts suddenly are interrupted by a the sound of your flower girl crying because she’s fallen and now has a run in her stockings, followed by your maid of honor complaining that her shoes are going to give her a blister, and you just heard that one of the groomsmen has spilled his last-minute meatball sub down the front of his tuxedo shirt. Congratulations!

Fortunately, you have a well-stocked wedding day emergency kit on hand, thanks to your planner. Crises averted. For the brides that need to make sure they are prepared for the worst, below are your must-have items for wedding day emergencies:

  • 1.     Full sewing kit – in the event of a loose button or split seam
  • 2.     Clear nail polish – stop runs in their tracks
  • 3.     White chalk –  to mask stains
  • 4.     Moleskin – for blisters
  • 5.     Bandages – last minute alterations can be dangerous
  • 6.     Pain reliever – for the Drama Queen, er, maid of honor
  • 7.     Nail polish in your shade – freshen up your manicure
  • 8.     Double sided tape – for wardrobe malfunctions
  • 9.     Adhesive hem tape – stop loose hems in a snap
  • 10.  Snacks/antacid – nausea doesn’t look good on anyone

There you have it. With these tools at your disposal you can take on anything that comes your way on your big day, and have time to tuck your cape in and be cool, calm, and beautiful as you walk down the aisle.

HAPPY WEDDING ;-)

If you have any wedding planning questions you don't see here, Tweet us at #hollicon and we'll answer you on the blog! —Holli Anne

Ways to Save on Wedding Invitations + Some Fun Designs


I realized earlier today that I've never blogged about our wedding invitations, which does seem a little crazy considering you are ALL invited to our wedding via instagram (#hollicon). 

Our wedding invitations were one of our big money savers. Also, they are one of my favorite details, generally. I love that slab serif font, our colors and definitely the style of it all. 

I think it does a great job of showing our guests what kind of event they'll be attending. 

They were designed by my fiance, Joseph Melancon, which obviously helped us save some cash. An even bigger bonus is that he works at a print shop, so we were able to get the invitations at cost.

We used red envelopes, which I ordered from Wiregrass Weddings, one of our #hollicon partners

While everyone might not have the luxury of an in-house graphic designer or the close-connection to a print shop, I do think there are some key things we did that could help everyone save money on invitation costs. 

1. Keep it simple

One page, front and back. We investigated doing some awesome foldout invitations with lots and lots of fun cards and information. They are definitely awesome. But not only will the design and printing cost more for a big package, but the shipping will, too. The heavier the envelope, the more likely just one stamp won't be enough. 

2. Electronic RSVPs

We debated over doing things the old-fashioned way and including a stamped response card and then we decided not to do that. Why? Many of my married friends tell me they never get them back in the mail anyway. So, while it's nice to support the post office and all, we opted with the e-mail, phone call RSVP option. Yes, I did have to track down some people in the end, but so have all my friends who included response cards. If I were doing it over again, I would have done things exactly the same way.

3. Price scout

Definitely consider the different services you need and shop around. Go with quality and find somewhere that matches that price-wise. (I, of course endorse Wiregrass Weddings). But I also endorse doing a little research and penny pinching. It may take a little more time to save money on your wedding, but this tip should translate to ALL your wedding details if you want to keep that bottom line low. 

4. Avoid fancy

Don't confuse this with me saying "avoid classy." There's a lot that can make even formal invitations look sharp. But, when you want to pinch pennies, stay away from hand-drawn calligraphy (or hand-drawn anything) and letterpress. There are ways to get similar looks by using graphics and in some printing techniques. 

There are plenty more ways to save, but I'm not going to pretend to be a print expert either. These were just the elements we used in keeping our costs down and would have especially used if we didn't have the print shop connection.

Do you have any other wedding invitation questions? Tweet to #hollicon or comment below and we'll get you an answer!

—Holli Anne 

Saturday, March 2, 2013

Wedding hair, nails & veils!

I'm just a week away from my wedding (#hollicon), and I couldn't be more excited about it! I don't think it's really sunk in how real it is, but maybe that comes later.

Now that all the big things are out of the way, like purchasing these Modcloth shoes, it's time to get down to the little details. That means a week of lots of DIYs, baking, coordinating and shopping to come.

Tonight, though, I've just been scheming up some ideas for my hair, nails and veil. Let me explain the last one. I've given my friend Chelsea free reign over making my veil for me, so the inspiration I've gathered were just some ideas for her.


That same awesome friend Chelsea is also doing my hair for the big day. I'm going to wear a headband at the reception, so probably not the big flowers in my hair, but I am definitely digging some sort of curly-side up-do.


My friend Theresa in the wedding party, who just so happens to be a nail tech, is doing my nails. I am definitely leaning toward some glittery-type french manicure using gold glitter.


Like I said earlier, I didn't know what the veil will look like, but here's some lovely inspiration! I love them all so much.

Details are my favorite part, by far. I can't wait to see it all come together!

—Holli Anne

Thursday, February 28, 2013

Free Wedding Planning Advice from Industry Professionals


If you have been following our #hollicon blogs, you may have heard me mention my big, fun, DIY wedding that's going to run me around $3,000 when it's all said and done. 

My inspiration for blogging about my wedding, besides the heavy amount of DIYs I'm doing, is that I had trouble finding wedding planning advice for having an affordable wedding that didn't call me to make huge compromises. There are some great sites out there for sure, like the Broke Ass Bride, so don't get me wrong there. We couldn't downsize our families and we sure couldn't leave out our dearest friends!

So, a combination of my intense stubbornness and some good old-fashioned thinking outside the box has led me here. 

With #hollicon, yes, I do want to keep blogging about my wedding, showing fun DIYs and sharing some girly details (because I just can't help myself, there!)

But I also want to use this event as an opportunity to let you get some wedding planning advice on a budget that I may not blog about here.

I'm obviously not an expert on wedding planning, but I have been researching a lot during my engagement process and well, even if I'm not doing something for my wedding, there's a chance I have had many a back-up idea in my head. 

I've also invited some of my dear wedding vendors to partner with Tyler and I on this event. 

Photographers-Crazy Love Studios, Wedding Stationery-Wiregrass Weddings and my nail tech, Theresa Kiernan are all partners. In addition, we have a caterer Divine Dinners and an event planner Distinctive Soirees who will be offering some wedding advice (and I'm sure they might answer some questions, too).

Here's how this works. From now until March 9, 2013, you can tweet a question with #hollicon and I (or one of our professionals) will answer ANY wedding planning question you have here on the blog. For free!

If you don't have Twitter you can comment below or send us an e-mail chasingthere(at)gmail(dot)com. 

In the meantime, we hope you'll enjoy our guests' and our many wedding blogs! 

—Holli Anne

Wednesday, February 27, 2013

Wedding: The Jewelry!


Yesterday, I finally finished the jewelry part of accessorizing my outfit for the big day. All it took was a trip to Francesca's. Have you ever been there? It's not very large but I always find I can get lost looking in there for hours!

So to compliment my teal and red colored wedding, I found that necklace above for a nice pop of red.


And these earrings and this bracelet to add in a touch of teal/turquoise.


This headband to wear at the reception.


And this gold bracelet I found at an antique jewelry store a while back or this dainty pearl bracelet just might find their way into my wardrobe.

I wish I could show you with the outfit, but I guess I'll have to wait a few days for that!

Do you like?

—Holli Anne

LinkWithin

Related Posts Plugin for WordPress, Blogger...
Pin It button on image hover