I am the QUEEN of clutter. You think your tiny space has a lot going on? Probably can't compare to mine. Over the years I've squashed most of my pack rat urges but there are just some things I can't quite let go of. So I put random trinkets in plastic tubs, boxes or just let them roam freely throughout the apartment. A part of me is deeply ashamed at my lack of will power but some tendencies are too hard to let go of sometimes! (It also doesn't help that I live with Dude who doesn't believe in organization or, for the matter, laundry baskets.)
I probably could have continued to live my life as the Ruler of Unnecessary Clutter but since I work from home, I get a 24/7 view of messy clutter and I just can't take it anymore!
So, with one of the MANY To Do lists I've acquired, I've decided to tackle the confounding corners of doom that reside in my apartment. For all of you out there who live in tiny spaces but have a lot of things (whether unnecessary or not) you may have one or two of these.
What are CCDs?


Thursday, August 30, 2012
A Poor Girl Fix: Nails, Nails, Nails
Technically I'm not poor. I'm "budget-conscious." Running a business from home can ware on the ole cash flow occasionally so when I get a comfortable amount of money to spend, my first thoughts don't go to my nails. But I couldn't deny that my talons had gotten a little out of hand and something had to be done.
So where did I go to meet my French manicure needs?
Rite Aid.
Trendy, right? Rite! (See what I did there?)
Somewhere on that there Pinterest I saw a cheap trick to help get that French manicure look without pumping out the dough.
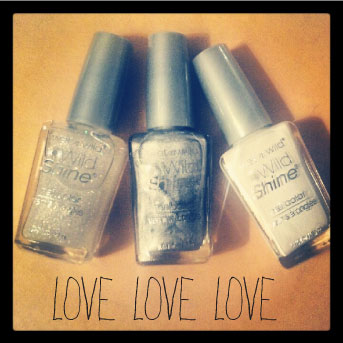 Here's what you need & what I purchased:
What you do next is pretty simple but here's what I did to get my nails tipped in silver (because I wanted to be different, duh) and looking simple yet classy.
1.) Get some sweet tea or wine.
2.) Make sure your cat or dog is in another room because they sure want to be all on you RIGHT when your nails are wet.
3.) Clean your nails and strip them of any polish.
4.) Take your clear polish (or clear with SPARKLES) and paint each nail once. Wait until they dry then give them all another coat.
5.) Take the reinforcement circles and put them under the top part of your nail that you want tipped white. My nails aren't that long right now so my tips are bitty!
6.) Take your white polish (or any color you want) and carefully paint the tips of your nails. Don't worry about getting it on the rest of your nail! The reinforcement circle is a nifty little guard! Let it dry and do another coat!
7.) Take off the circles and BAM! A poor girl's fix to a sketchy French manicure!

So there it is! If you have a job where you look at your nails a lot or OTHERS look at your nails a lot, don't be ashamed if you can't justify a mani/pedi in your budget. Instead go to the school supply section of Rite Aid, Walgreens, CVS or Wally World and start the fabulous process of a poor girl's fix for your nails!
__________________________________________________________________________________
Follow my blog with Bloglovin
So where did I go to meet my French manicure needs?
Rite Aid.
Trendy, right? Rite! (See what I did there?)
Somewhere on that there Pinterest I saw a cheap trick to help get that French manicure look without pumping out the dough.
- Reinforcement Labels (those annoying little circles you put around the holes in your paper so your binder can hold it)
- Wet N Wild's Wild Shine nail polish (on sale at Rite Aid for less than a dollar at the moment)
- Patience (I would have bought it but they were all out)
What you do next is pretty simple but here's what I did to get my nails tipped in silver (because I wanted to be different, duh) and looking simple yet classy.
1.) Get some sweet tea or wine.
2.) Make sure your cat or dog is in another room because they sure want to be all on you RIGHT when your nails are wet.
3.) Clean your nails and strip them of any polish.
4.) Take your clear polish (or clear with SPARKLES) and paint each nail once. Wait until they dry then give them all another coat.
5.) Take the reinforcement circles and put them under the top part of your nail that you want tipped white. My nails aren't that long right now so my tips are bitty!
6.) Take your white polish (or any color you want) and carefully paint the tips of your nails. Don't worry about getting it on the rest of your nail! The reinforcement circle is a nifty little guard! Let it dry and do another coat!
7.) Take off the circles and BAM! A poor girl's fix to a sketchy French manicure!

So there it is! If you have a job where you look at your nails a lot or OTHERS look at your nails a lot, don't be ashamed if you can't justify a mani/pedi in your budget. Instead go to the school supply section of Rite Aid, Walgreens, CVS or Wally World and start the fabulous process of a poor girl's fix for your nails!
__________________________________________________________________________________
Follow my blog with Bloglovin
Wednesday, August 29, 2012
Mantel Love: Your Living Room's Thesis Statement
Do you have a mantel that makes you ashamed? Does it have so much potential that you know you've missed? Are there random knick knacks that you just threw up there because--let's be honest--there isn't anywhere else to put the bronze skull statue your significant other bought at a garage sale or that Beanie Baby that lost its tag when you were 12?
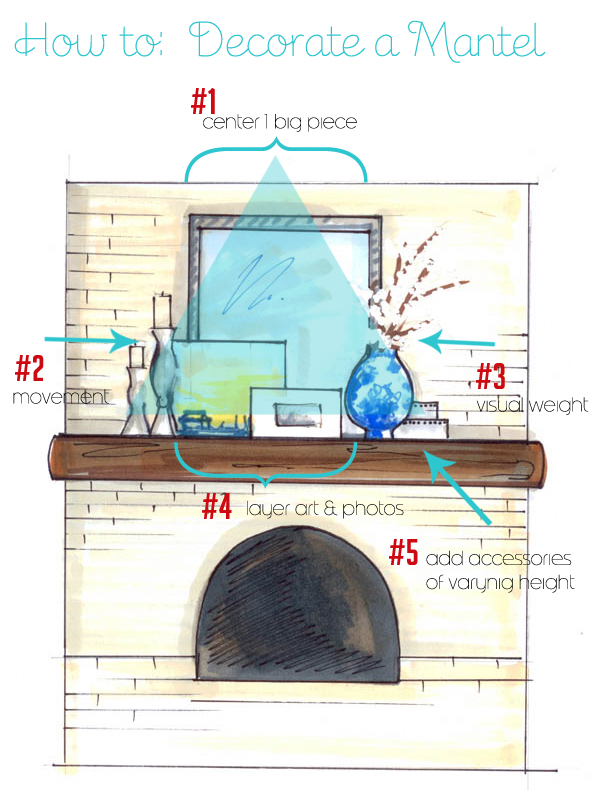
 1.) Center a large piece on your mantel.

To me, the mantel is like your living room's thesis statement--this is who I am, this is what I love.
There are so many statements you can make that it's easy to get gun shy. You dig the fam jam, are totally utilitarian, have a wicked color addiction or dance to the own beat of your drum. Which will it be? And once you have a theme, will you be able to pull it off?
Well I may not have a fireplace/mantle but I have a lot of ideas of what I want to do with one when I have it. Here's a compilation of ideas and pictures taken (and linked back to) other blogs and Pinteresters plus a few ideas of my own!
Honey & Fitz (a blog definitely worth a follow) posted an article that inspired my love of the mantel I don't-yet-have. In this post they had a picture that showed the flow of a nicely decorated mantel for those needing a creative boost.
Normally I try to come up with my own decorating rules (because my momma raised me stubborn) but what Honey & Fitz did (and Steven and Chris before them) really pleases me. Visually it's pleasant and has a lot of potential.
So here are five easy ways to make a visual triangle out of your lovely mantel décor plus some great Pinterest finds to make my imaginary mantel aesthetically-pleasing.
1.) Center a large piece on your mantel.
You can go either art or mirror. I love the look that a unique mirror can bring to a room but for a mantel I would have to go with art. So, in my quest to decorate MY future mantel, I picked Artist Yuka Nareta's Focus. This watercolor appreciates my love for whites space, color and inspirational quotes.
2.) Add something with movement to the left. You want your eye to visually flow from one direction to the other.
This is where I go in search of fun knick knacks that are a part of a collection and of varying sizes. How about those trendy owls? You just can't go wrong with owls--no matter their color, size or medium. Place the shortest one on the outside and line them up to the tallest.
3.) Add something with visual weight on the right. This will counterbalance the movement element on the left.
This is where that great vase you have tucked away in a cabinet or lonely on top of the refrigerator comes into play. Bold, beautiful color or wacky design would definitely make a statement. I personally want a vase that, even if there aren't beautiful flowers in it, can still make a statement. So I mustache you, why not a vase with facial hair?
4.) Layer in a couple of additional frames pieces in a cluster.
This is when I would bring out the funky colored frames of different sizes and designs and fill them with silly pictures of loved ones.
5.) Balance that on the opposite side with a couple of accessories in a cluster of varying heights.
Books, books, books! If you're a book lover then you have plenty of them around. Do you have a few special editions that are just adorable? Use them! Take a few books and stack them up to the right of your mantel. Get a few more little knick knacks that don't necessarily come from the same collection and place them on top of those lovely books!
These are the five steps to make a great-looking mantel. To tell your guests that YOU ARE AWESOME and so is your house! If you're like me and don't have a fire place or a mantel yet, don't fret! You can still design one and dream!
Remember, we may not have our dream house yet, but we're almost there!
__________________________________________________________________________________
Follow my blog with Bloglovin
Subscribe to:
Posts (Atom)