Almost There: christmas
Showing posts with label christmas. Show all posts

Tuesday, December 25, 2012

Merry Homemade Christmas

You may have noticed from our 12 Days of Christmas Craze, but just in case, I'll go ahead and tell you that I'm pretty into Christmas.

I get so excited about it every year and I start to go handmade crazy. This year I crafted up my fiance a sweet little book of cards, made my mom a birdhouse out of pottery and baked like crazy!

I'm sure no one out there is still making any Christmas presents, but most of these are universal for any time of year, so I thought I'd just share my version of a homemade Christmas!

You may have seen some version of a 52 Things I Love About You book before on Pinterest. This is the one I was inspired by.

For my book, I just flipped the cards over on their pretty sides and wrote in a Sharpie. Then I cut up paint chips and glued them in between the cards onto paper and put them in a photo album. My fiance (and his whole family) loved it.


For his family, we did a ton of baking because really, who doesn't like a bunch of junk food for Christmas?

We made peanut brittle, rocky road fudge, sugar cookies and chocolate peanut butter cookies. We also geniusly took the caramel popcorn out of one of those popcorn tins (because they always have way more than the butter and cheese popcorn) and drizzled it in melted chocolate.

The recipes for peanut brittle and rocky road fudge can be found here. The chocolate peanut butter cookies are ritz crackers with peanut butter in them dipped in melted chocolate. Brilliant, delicious and so simple!
The sugar cookie recipe is a family favorite, but I forgot to bring it with me so I'll blog about those cookies later. We painted brown bags and packaged up all the goodies in there.

Finally, I took a pottery class last year from my friend Walter Black. He doesn't have a Website yet, but when he gets one I'll probably blog about how cool his work is. Anyway, I made my mom a birdhouse because she likes them, and it's a sweet tradition she and I have where I get her birdhouses at Christmas.


 How has your Christmas been? Did you give away any handmade presents this year?

-Holli Anne

Friday, December 7, 2012

Christmas Craze: Coaster Craze

Christmas Craze? More like Coaster Craze! See, I've been kind of addicted to making drink coasters lately. It's not that I drink an abnormal amount and need extra coasters around the house, I just WANT tons of them all different!

So I figured if I want them so badly, then maybe other people will too! So here's Christmas Craze Day 7! (Day 1 | Day 2 | Day 3 | Day 4 | Day 5 | Day 6)


This Christmas Craze DIY is all about designing & making coasters as a personal, awesome, inexpensive gift for Christmas!

If you know me then you probably have picked up on the fact that I'm semi-obsessed with Design Love Fest. I check it everyday and often am absolutely inspired by the creativity of it. So when I read Make It / 25 I instantly fell in love and knew I HAD to do it. All credit for this idea definitely goes to them!

Now, to the Batcave everyone!

What you'll need:

  • A design for your coasters! Mine can be found below. You can simple click it and save it to your desktop then print.
  • Access to a printer! Make sure you have enough ink!
  • Cork coasters! I got mine from Hobby Lobby. $2.77 for 6.
  • Mod Podge Matte
  • Spongey brush
  • Photo paper! I got soft gloss photo paper from Target. Letter size to make it easier.
  • Scissors
  • Tacky Glue
  • Felt


What I did first was come up with a fun color scheme and font. Since I have recently found M3 Design and this lovely post with a lovely font, I used the Ostrich Sans font family! Then the colors from this pin! (I used Adobe Illustrator to make my design. If you have that and aren't sure how to use it, leave a comment and I'll make another post about how to do it! I would do it now but I need to pack up the apartment something fierce!)

Once you have your design, print it out onto your photo paper! Then with scissors (or X-acto knife if you can cut circles like a pro...I really can't!) cut out your designs. Now, I created and printed my design out then put my printer into a box BEFORE I actually bought my coasters. I downloaded Design Love Fest's pretty designs (again, go here to see) and was using those sizes as a template. However, the coasters I got from Hobby Lobby are a tad bigger BUT it's an easy fix!


Take your mod page and, using your spongey brush, cover the coaster thoroughly. Then take your design and place it onto the coaster. Make sure to get the bubbles out by running your finger over the design. Then put it under a book while it dries. Do the same to the rest of your coasters and designs!


After they are dry, put a coat of mod podge over the design. I did three coats each.

Now, if you are using the coasters from Hobby Lobby that are a tad too big, just take your scissors and cut off the excess cork. It cuts really easy unlike its brother, the cork squares!

If you don't want the bottom to be cork (I LOVE CORK) take your felt and use tacky glue to glue it to the bottom of each coaster!

I hope you enjoyed this DIY! Once I'm unpacked in my NEW place (hopefully tomorrow!) I'm going to set up my studio and be able to make another round!


Day 1 | Day 2 | Day 3 | Day 4 | Day 5 | Day 6


Monday, December 3, 2012

Christmas Craze: Handmade Wreathes


12 of Christmas Craze is brought to you by Almost There and We, Vagabonds! Check out Day 1 and Day 2!

I have never had my own wreath. SO THIS IS WHAT I DID TODAY!

Instead of one large wreath I wanted two smaller ones because right now there's not a lot of space in the apartment and I'm moving next week so I thought it would be easier!

First I decided to make a clothespin wreath. I had seen a lot of them on Pinterest and wanted to make one with my own flare.

What you need:

  • Clothespins! I used about 23! You can get them at Walmart or any craft store for really cheap!
  • Paint! I used black paint and metallic paint.
  • Wreath frame! Craft store!
  • Clear Chalkboard Coating
  • Paintbrushes! 

First I went ahead and clipped the pins on the frame and decided what pattern I liked. Then I painted every other pin black. I used my clear chalkboard coating after the paint dried so I can use chalk on each one. Then I let it sit.

Next I decided to go with metallic gold paint for the rest of my pins.

While I let them dry I wanted to give the wire frame a touch of green. So I got my green hemp and did this little goofy move!

I let everything dry for about an hour! Then I got my chalk out and made little doodles on each black pin! 

This wreath is funky but I have to say I'm very pleased! What I like the most is that everything that was used to make it can be reused after the season!

Next I wanted to make a super simple but pleasing to look at wreath with string!

What you need:
  • A Styrofoam Wreath! Get some tape to close the gap at the top!
  • String/Hemp! It's up to you!
  • Scissors
  • Hot Glue Gun & Glue

This wreath is super simple to make. It took me about thirty minutes to wrap the whole thing. 

I found it was easier to wrap it in sections rather than try to do the whole thing in one go. I used dabs of hot glue to keep the string on each end.


To add some color to my simple wreath I got my green hemp and did another little goofy loop around it.

So there it is! Two handmade wreathes that are easy to make and are fun to add to your holiday decorations!

Hope you enjoyed!


Saturday, December 1, 2012

Christmas Craze: Felt Ornaments

Oh man, it's December! I'm so pumped and I definitely know that Holli (over at We, Vagabonds) is over the moon about it too! That's why we decided to combine our love for DIY projects and Christmas to do our 12 Days of Christmas Craze (check the ad here)! So many exclamation marks!!!!

Today (Dec. 1) I am starting off the craze by combining three little DIY projects into one. I want it to be noted that the reason this is getting posted so late is because I have a cold and a Milo. These two facts make crafting in a timely manner almost impossible! But, never the less, I hope you enjoy!

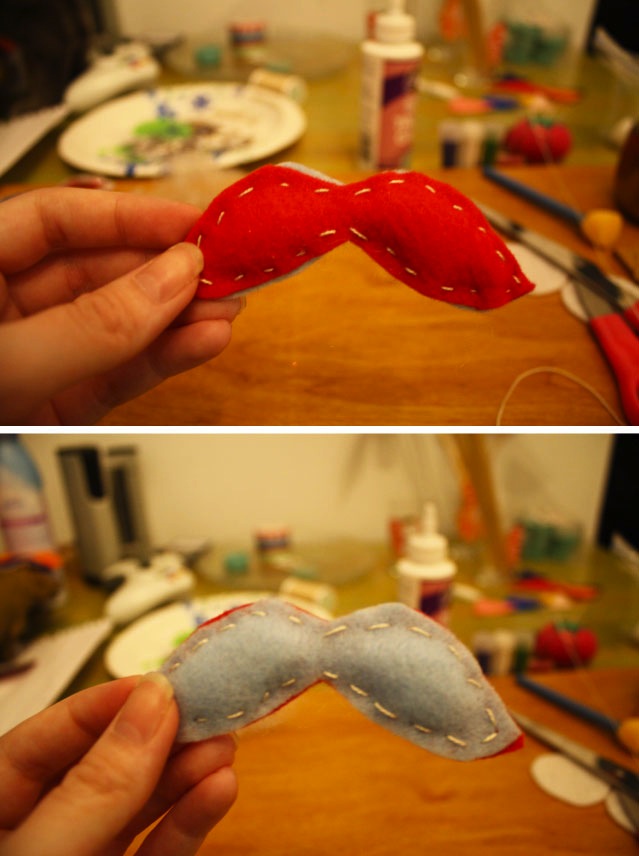
I love felt. It's cheap, pretty, and you can make tons of unique things with it. Since I'm in the middle of a move (we actually move next weekend) I got a tiny tree from Hobby Lobby and wanted to make my own little ornaments for my own little tree. So, as I thought about it, I decided to go with mustaches, glitter, and triangles as my first round of handmade ornaments!


First, I'd like to start with my favorite ornament!

What you need:
  • Felt! For one mustache choose two different colors of felt for a fun look!
  • String! You can really use whatever you want as long as you can thread it through a needle.
  • A needle!
  • Poly-Fil! Or something you can stuff the mustache with!


The steps are pretty easy once you have your mustache pieces cut out. Start sewing around the edges but make sure to leave a gap open to stuff both sides of the mustache before sewing the whole thing closed! Once again, I had some Poly-Fil so I used that to stuff the inside.

Then BAM! The mustache was finished! I like it looking a little sloppy so I got a bigger thread so it can be seen easily and also left some of the felt uneven so I could still see the other color when it hangs on the tree. After this I just got some string and attached to the top so I could put it on the tree!
Next I did some glitter felt combos!

What you need:
  • White felt cut in circles!
  • Glitter! I kept it Christmas-y!
  • Two paint brushes
  • Glue of any kind! I used tacky glue because I had a lot of it!
  • Metallic paint! Though you really don't need this. Glue will do.
Take your sponge paintbrush and dip it in your glue. Apply it to your circles and then put your glitter on a plate or in a bowl (that you can throw away afterwards)! Then take your still wet circles and put them in the glitter until a good amount is covered.

I have a tiny tree so I didn't need to cover all of the circle. I just made sure there was a big enough chunk that looked good and then cut out different circles from them after they dried.

I PROMISE you they look way better in person! Just thread a string through them and put them randomly on the tree! Since my little tree doesn't have lights yet, these add some shine to it!

Lastly, the easiest ornament of the bunch!

Am I weird for loving triangles like I do? Because I really do love them. I actually made this first and decided I liked it a whole bunch!

What you need:
  • Felt! Different colors!
  • Thread! I used the same thread from the mustache one.
  • A needle!
This is easy peasy, folks! Stack them the way you like (I did the biggest on bottom and the smallest on top) and then thread them all together making sure to have the knot on the bottom! Then make a loop so you can hang it on the tree!

So there you go! Three easy, quick DIY felt ornaments that may be simple but still are fun! It gives your tree a little bit of unique flare! I will be making more for my tiny tree that Milo tries to eat at every spare moment and post more pictures later! 

Check back every day for more Christmas Craze! More exciting DIY projects are on the way!


LinkWithin

Related Posts Plugin for WordPress, Blogger...
Pin It button on image hover